Scratch Programming: A Complete Guide to Scratch Coding for Kids
A-Z Guide to Scratch Programming for kids teaching them to get started with block-based coding
Introduction to Scratch Programming
For the last decade, the term Scratch Programming has been making the rounds on the internet. You may have seen in relation to learning to code, particularly coding for kids.
So, what exactly is Scratch Programming? What exactly is coding for kids?
Keep on reading and all your questions will be answered in no time.
Did you know that code powers your web browser, operating system, programs, and even the page you’re reading this on?
Every object we see around us has been coded/programmed to perform a specific task, so coding has become an essential part of our lives.
The fan above us was programmed to keep us cool by rotating around an axis.
The blanket on which we sleep has been coded/programmed to keep us warm.
Similarly, coding has influenced every object we see around us. Before we get started with Scratch coding, lets have an overview about coding in general.
What is Coding?
The question now is, what exactly is coding? Simply put, it is telling an object what to do. Assume your teacher assigns you homework, in which case you are the object, and your teacher, as a coder/programmer, asks/instructs you to complete a specific task that you must complete.
Similarly, when we, as instructors (coders), instruct the computer (object), it must comply; however, because the computer does not understand any vernacular language, the instructions must be given in the form of codes; this is essentially what coding is.
In general, there are two types of coding:
- Block-based coding (for example, Scratch, code.org, Thunkable, etc)
- Textual coding (eg C, Java, Python, etc)
Block Coding
The most fundamental form of computer programming is block-based coding. Instead of having to start coding with complex and complicated textual lines of code, block-based coding is a great way for kids to learn the fundamentals of programming quickly.
In block-based coding, children use visual blocks to create animations and games.
Using a visual interface, the platforms allow the child to simply drag and drop blocks in a sequence. Each block represents a line of code. So, in essence, the child is writing code without the use of text.
This enables children to quickly grasp the fundamental concepts and logic of programming.
Because each of the blocks perform a different function or command, all you have to do is arrange them in a specific order and the program you just created will run.
The use of blocks also makes it easier to detect and correct errors in the program.
Block-based coding’s visual and interactive process makes learning computer programming easier and more effective, especially for kids.
Benefits of Block Coding
When it comes to introducing a child to coding or programming, the importance of block-based coding cannot be overstated.
As a basic programming language, block-based coding enables children to gain a conceptual understanding of how coding works while creating cool animations, stories, or games, among other things.
Block-based coding makes coding fun and appealing for children by providing a simple, visual, and interactive way to learn code. This allows children to quickly learn computational thinking, which is required for all programming.
Another advantage of using block-based coding is that it has been shown to improve other important skills such as imagination, creativity, and communication.
Scratch Coding
Scratch is a free, visually engaging programming tool developed by MIT that aims to teach the fundamentals of coding to young children in a fun and intuitive manner.
Scratch coding employs a block-based coding mechanism that allows you to create animations, stories, games, and so on without writing code. Scratch coding is ideal for introducing children and young adults to the enchanted world of coding. And it is completely free of charge.
Download Scratch
STEP 1: Navigate to Scratch official website in any web browser.
STEP 2: Click on the Join button as shown above and enter the essential details required (like name, D.O.B, email ID, etc) and you can start using Scratch.
[NOTE: You can also use Scratch without joining Scratch but can’t save, share and avail some of the special features without joining.]
Refer to this blog to understand in details on how to download and access Scratch on Windows
Introduction to Scratch Interface
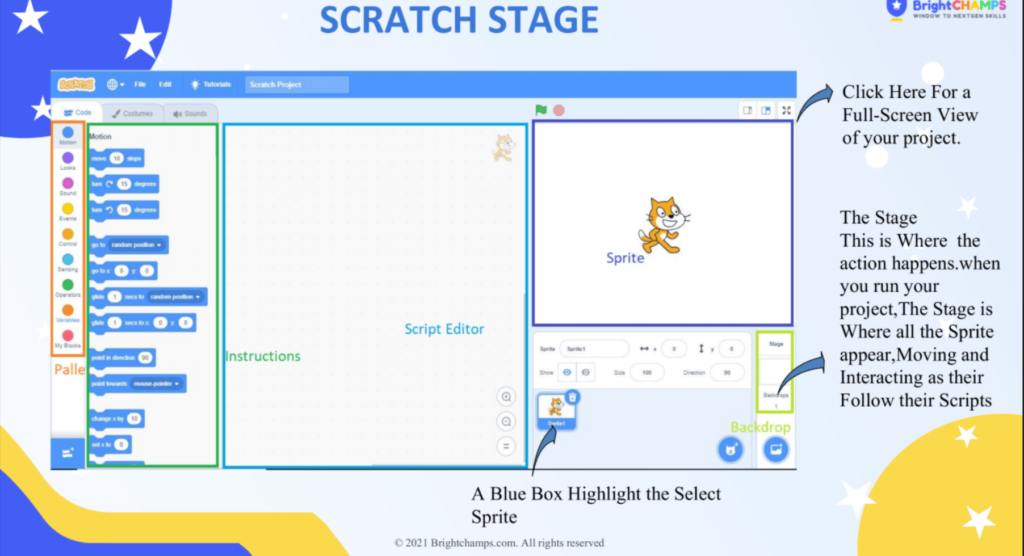
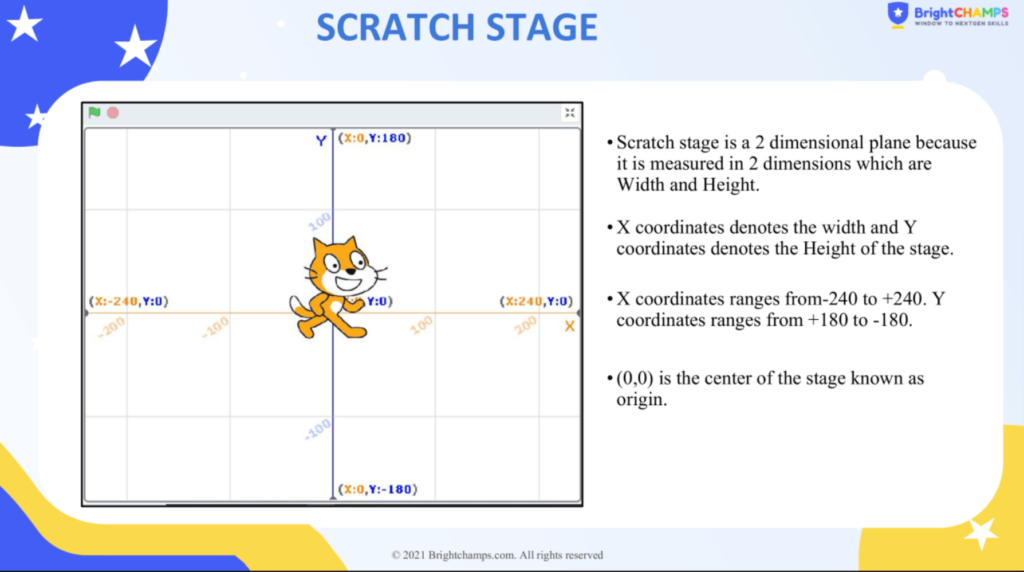
The Scratch user interface is the area on your screen that contains the Scratch program. The screen is divided into several sections or “panes,” each with a different function, such as selecting blocks to code with, coding, and viewing your code in action.
Scratch Interface Related Terms
1. Sprites and Backdrop
Sprites and backdrops are two types of graphic images used in video game design. Scratch includes a library of premade sprites and backdrops for users to choose from. You can also create your own graphics in Scratch or with the help of a third-party graphics editor.
Backdrops: Backdrops help to set the scene for your game. They are typically static images that fill the entire screen or play area. To view a list of pre-made backgrounds, click the icon that looks like a photograph in the lower-right corner. To select a backdrop image, click on it.
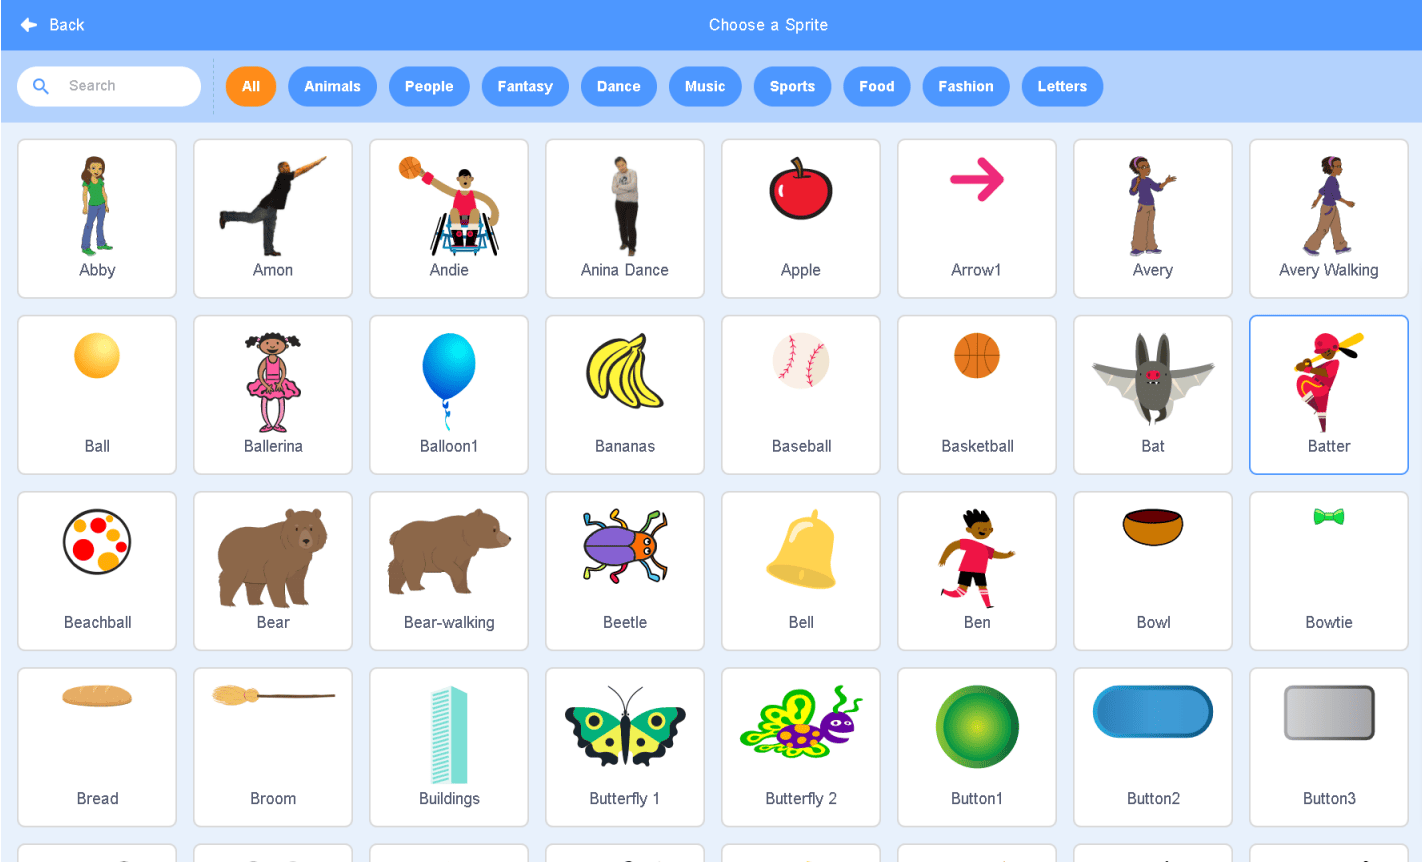
Sprites: Sprites are objects that appear above the background. They can be playable or non-playable characters, enemies or obstacles, power-ups, or other interactive objects. To choose a premade sprite, click the cat icon in the lower-right corner to see a list of premade sprites. Then, select a sprite to use. In the upper-left corner, all sprites in your project are listed below the play area. To remove a sprite click on the delete icon represented by a dustbin
2. Bitmap and Vector Images
Kids can easily create amazing 2D games in Scratch. Bitmap and vector images are the two types of 2D graphics that can be created.
Pixels: Pixels are used to create bitmap images. Bitmap graphics are not commonly used because they are usually one size fits all. Raster images can become pixelated or fuzzy when enlarged. Scratch supports the bitmap file formats JPEG/JPG, GIF, and PNG. Raster graphics can be created with Paint on Windows, the Scratch sprite editor, or Preview on Mac. You may prefer a more powerful image editor, such as Photoshop, or GIMP, a free alternative to Photoshop.
Vectors: Vector graphics, as opposed to raster images, are not made up of pixels. They are composed of data points known as vectors that are connected to form lines and shapes. They are the most popular Scratch graphics. Scalable vector graphic (.svg) image formats are supported by Scratch. Adobe Illustrator or Inkscape, a free alternative to Illustrator, can be used to create vector graphics.
3. New Graphics in Scratch
Hover the mouse cursor over the icon that resembles a photograph for backgrounds or the icon that resembles a cat for sprites to create a new background or sprite using the built-in graphics editor. Then, to open the built-in graphics editor, click the icon that looks like a paintbrush.
Click the icon that looks like a trey with an arrow pointing up over it to import an external graphic image. Then, click Open and select a JPEG/JPG, GIF, PNG, or SVG image.
4. Paintbrush Tool in Scratch
The paintbrush tool is used to freehand draw objects. To use the paintbrush tool, click the paintbrush icon in the toolbar to the left of the drawing area in the middle. Draw freehand with the paintbrush tool by clicking and dragging.
This generates vector shapes.
5. Shape Tool in Scratch
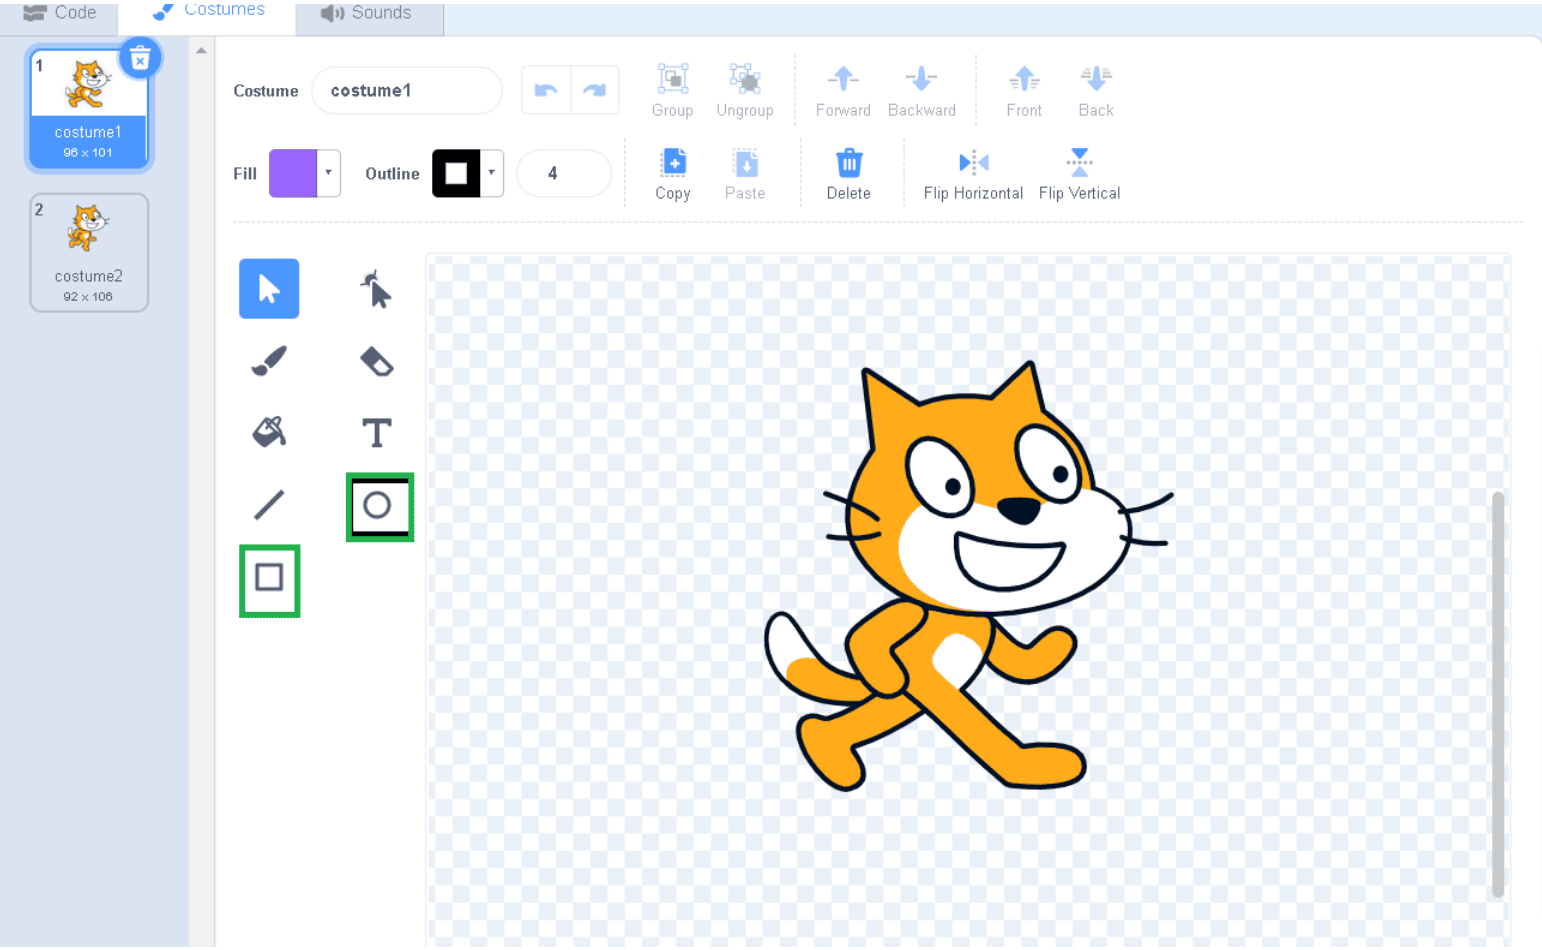
Scratch has two shape tools: the rectangle tool and the ellipse tool. Squares and rectangle shapes can be created using the rectangle tool. Circles and ovals can be created using the ellipse tool. In the toolbar to the left of the drawing area, select the icon that looks like a square or a circle. Then, in the drawing area, click and drag to create a rectangle or oval shape.
Hold down the “Shift” key while dragging to make a perfect square or circle.
6. Line Tool in Scratch
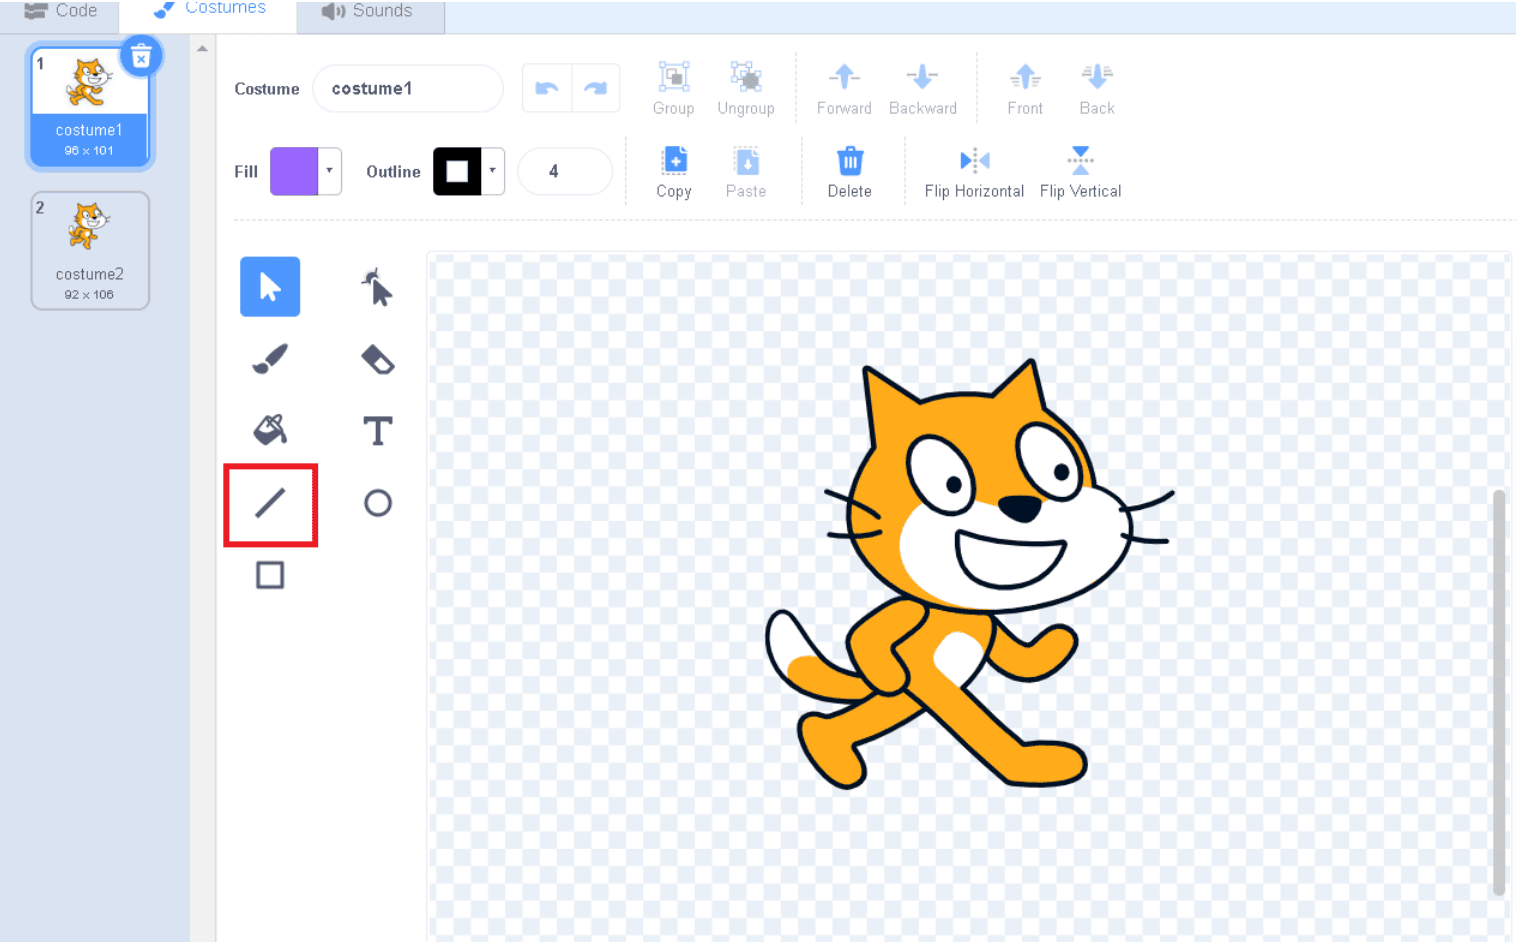
Straight lines can be drawn using the line tool. To use the line tool, go to the toolbar on the left and select the icon that looks like a straight line. Then, using your mouse, drag to draw a line.
7. Eraser Tool in Scratch
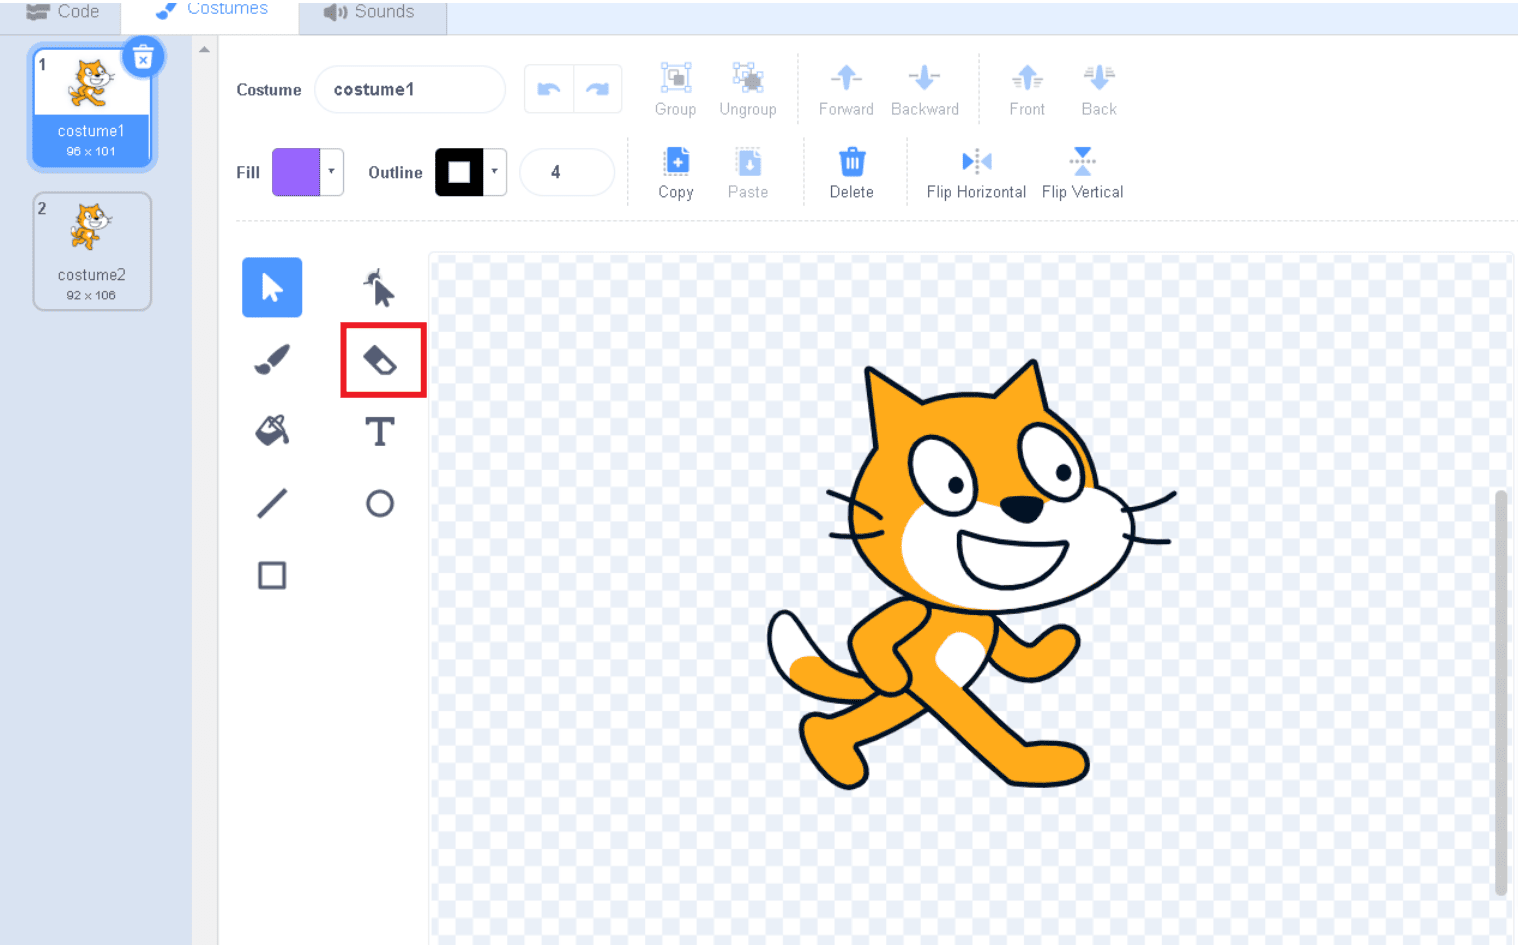
The eraser tool is used to remove parts of a previously drawn shape or line. To use the eraser tool, go to the toolbar on the left and click the icon that looks like an eraser. Then, click and drag over an image or a portion of an image to be erased.
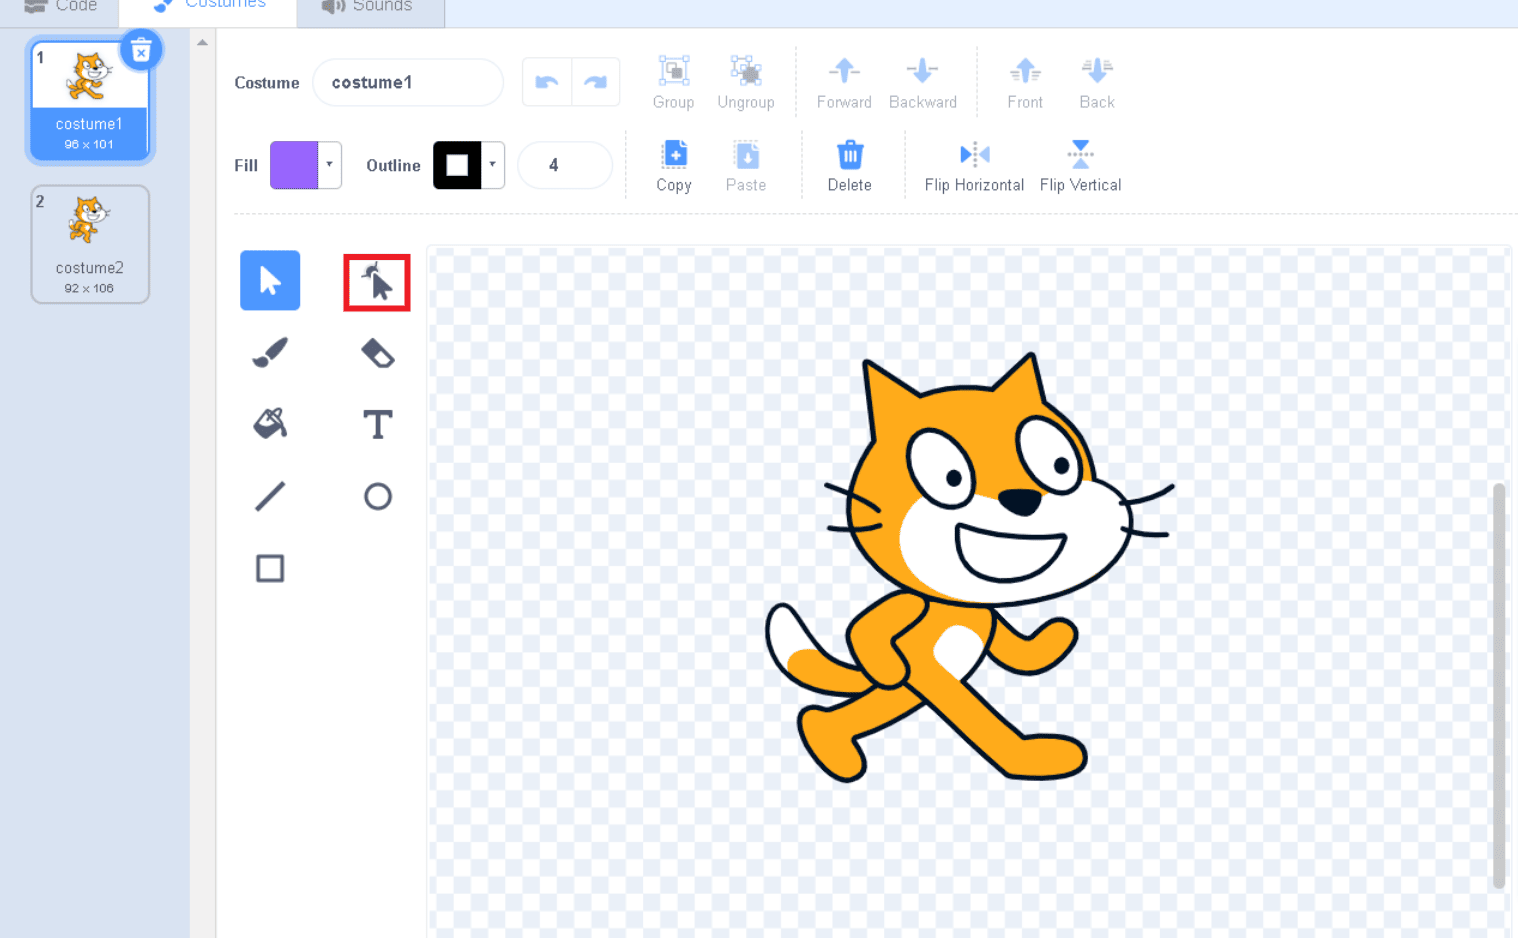
8. Reshape Tool in Scratch
To change the shape of a vector object, use the reshape tool. Click the icon that looks like a mouse cursor clicking a dot to use the reshape tool. This displays all of your drawing’s vector points. To change the shape of an object, click and drag the vector points.
To change a straight line to a curved line, use the reshape tool to select a vector point. Then, above the drawing area, select Curved. To make a curved line straight, click Pointed.
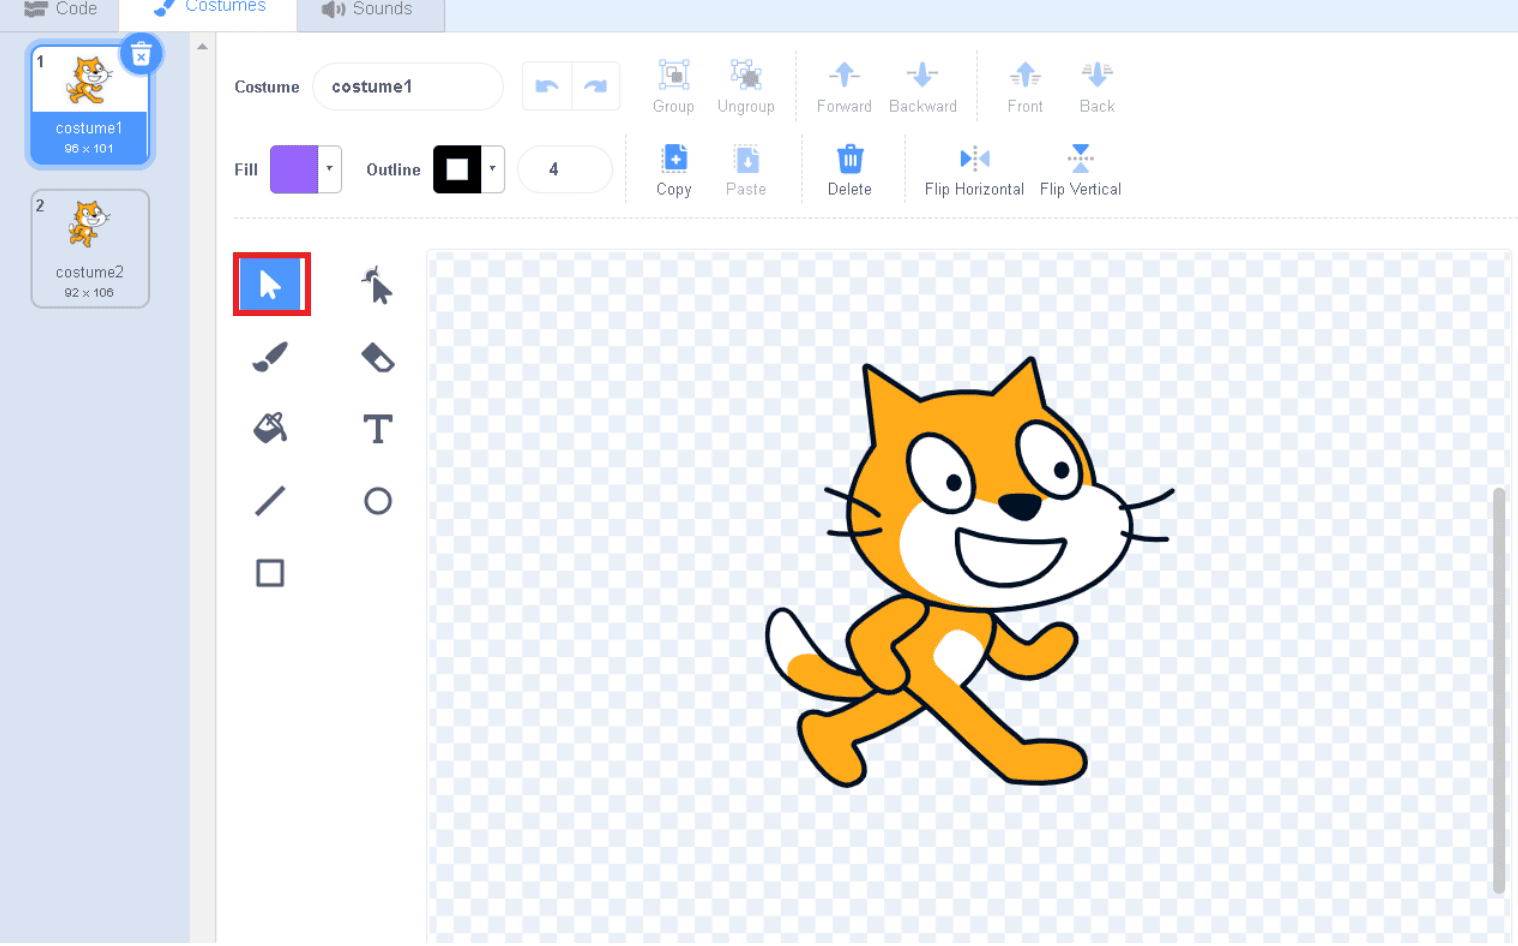
9. Select Tool in Scratch
You can use the select tool to select and move objects that you’ve drawn in the drawing area. To use the select tool, go to the toolbar on the left and click the icon that looks like a mouse cursor. Then, click an object to select it. To select multiple objects, click and drag, or hold Shift while selecting them.
To combine multiple objects into one, use the select tool to select all of the objects you want to combine. To group them, click Group above the drawing area. To separate objects that have been grouped together, click Ungroup.
Vector graphics, as opposed to bitmap graphics, are made of shapes that can be stacked on top of one another. To move an object behind or in front of another, use the select tool to select it. Then, to move the object up or down one layer, click Forward or Backward. To move an object to the top or bottom of your list, click Front or Back.
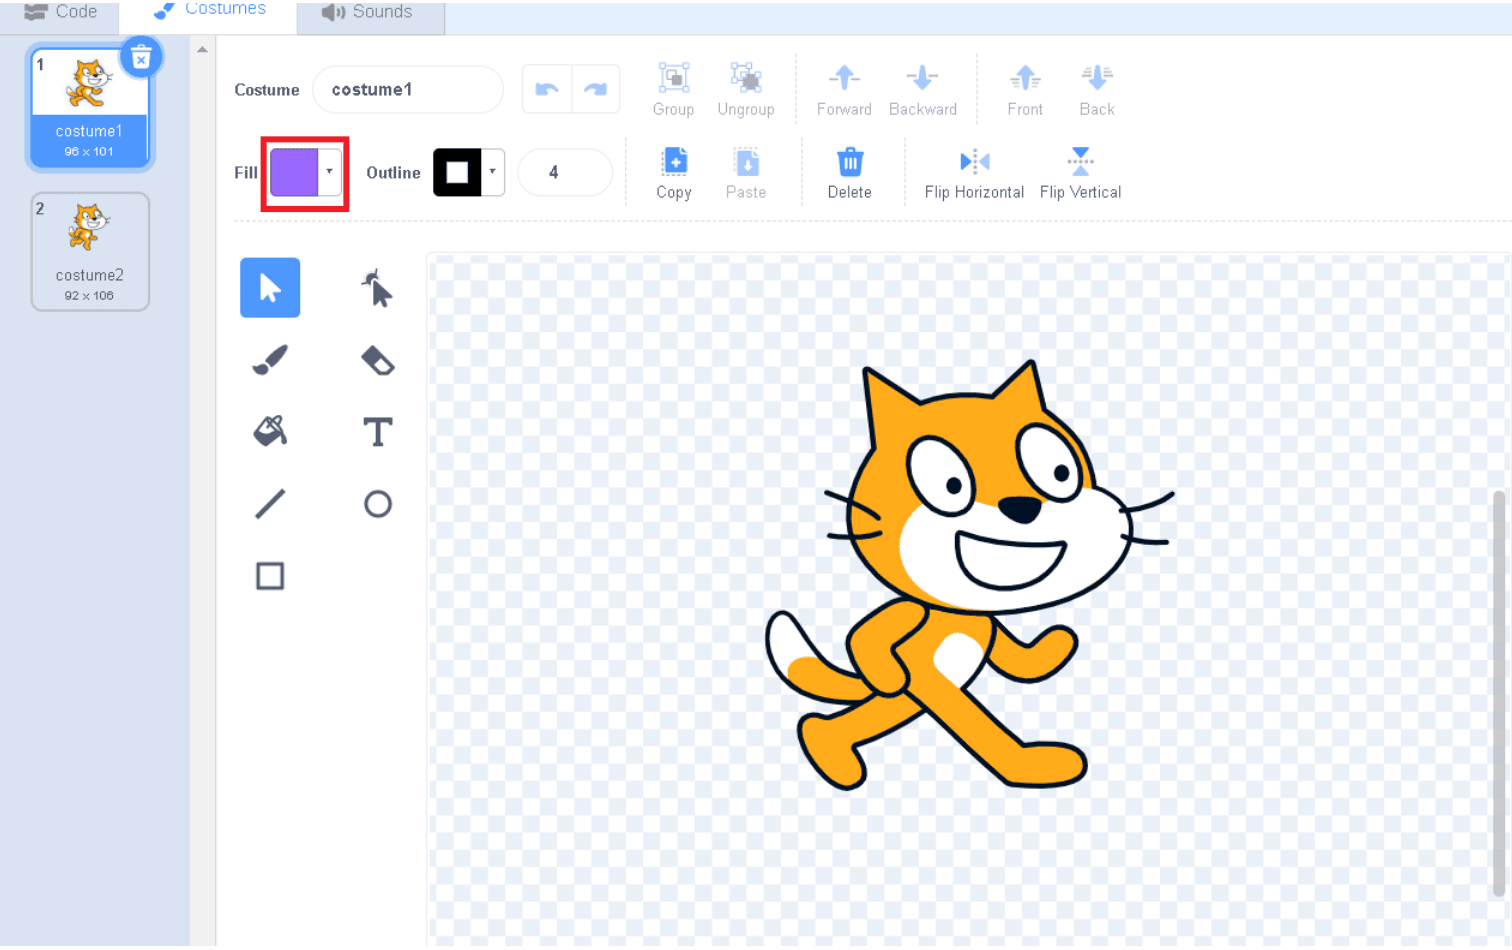
10. Choosing Color in Scratch
To choose a color, use the select tool to select an object or a drawing tool from the toolbar. Then, to choose a color for the inside of an object, check the Fill box. To change the color of the line that surrounds the object, check the Outline box. To choose a color, use the slider bar below “Color” to change the hue. To adjust the amount of color applied, use the slider bar below “Saturation.” To adjust the darkness of the color hue, use the slider bar below “Darkness.”
To remove the color, click the white box with a red line through it in the color selection menu’s lower-left corner.
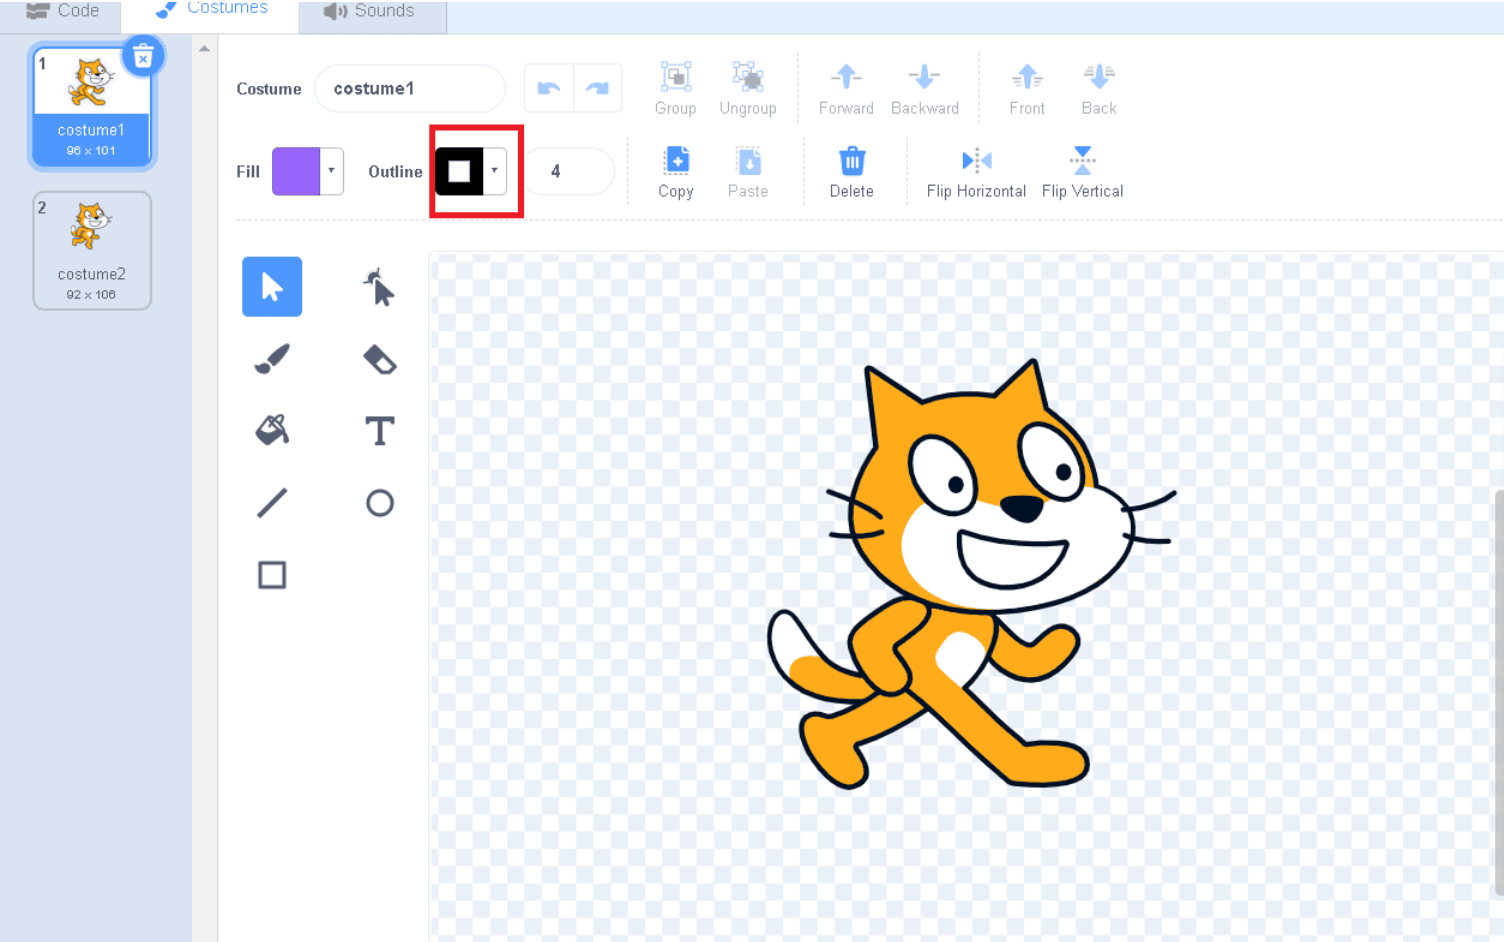
11. Choosing Line Thickness in Scratch
To change the thickness of a line, select an object with an outline or the line or shape tools. Then, in the box next to “Outline,” type a number or use the up and down arrows to adjust the line thickness.
To change the thickness of the paintbrush strokes, use the box next to the icon that looks like a paintbrush at the top.
12. Paint Bucket Tool in Scratch
The paint bucket tool is used to colorize a shape. To use the paint bucket tool, in the toolbar, click the icon that looks like a pouring paint bucket. To choose a color, use the “Fill” color picker. Then, inside the object you want to fill, click.
Assembling a Scene in Scratch
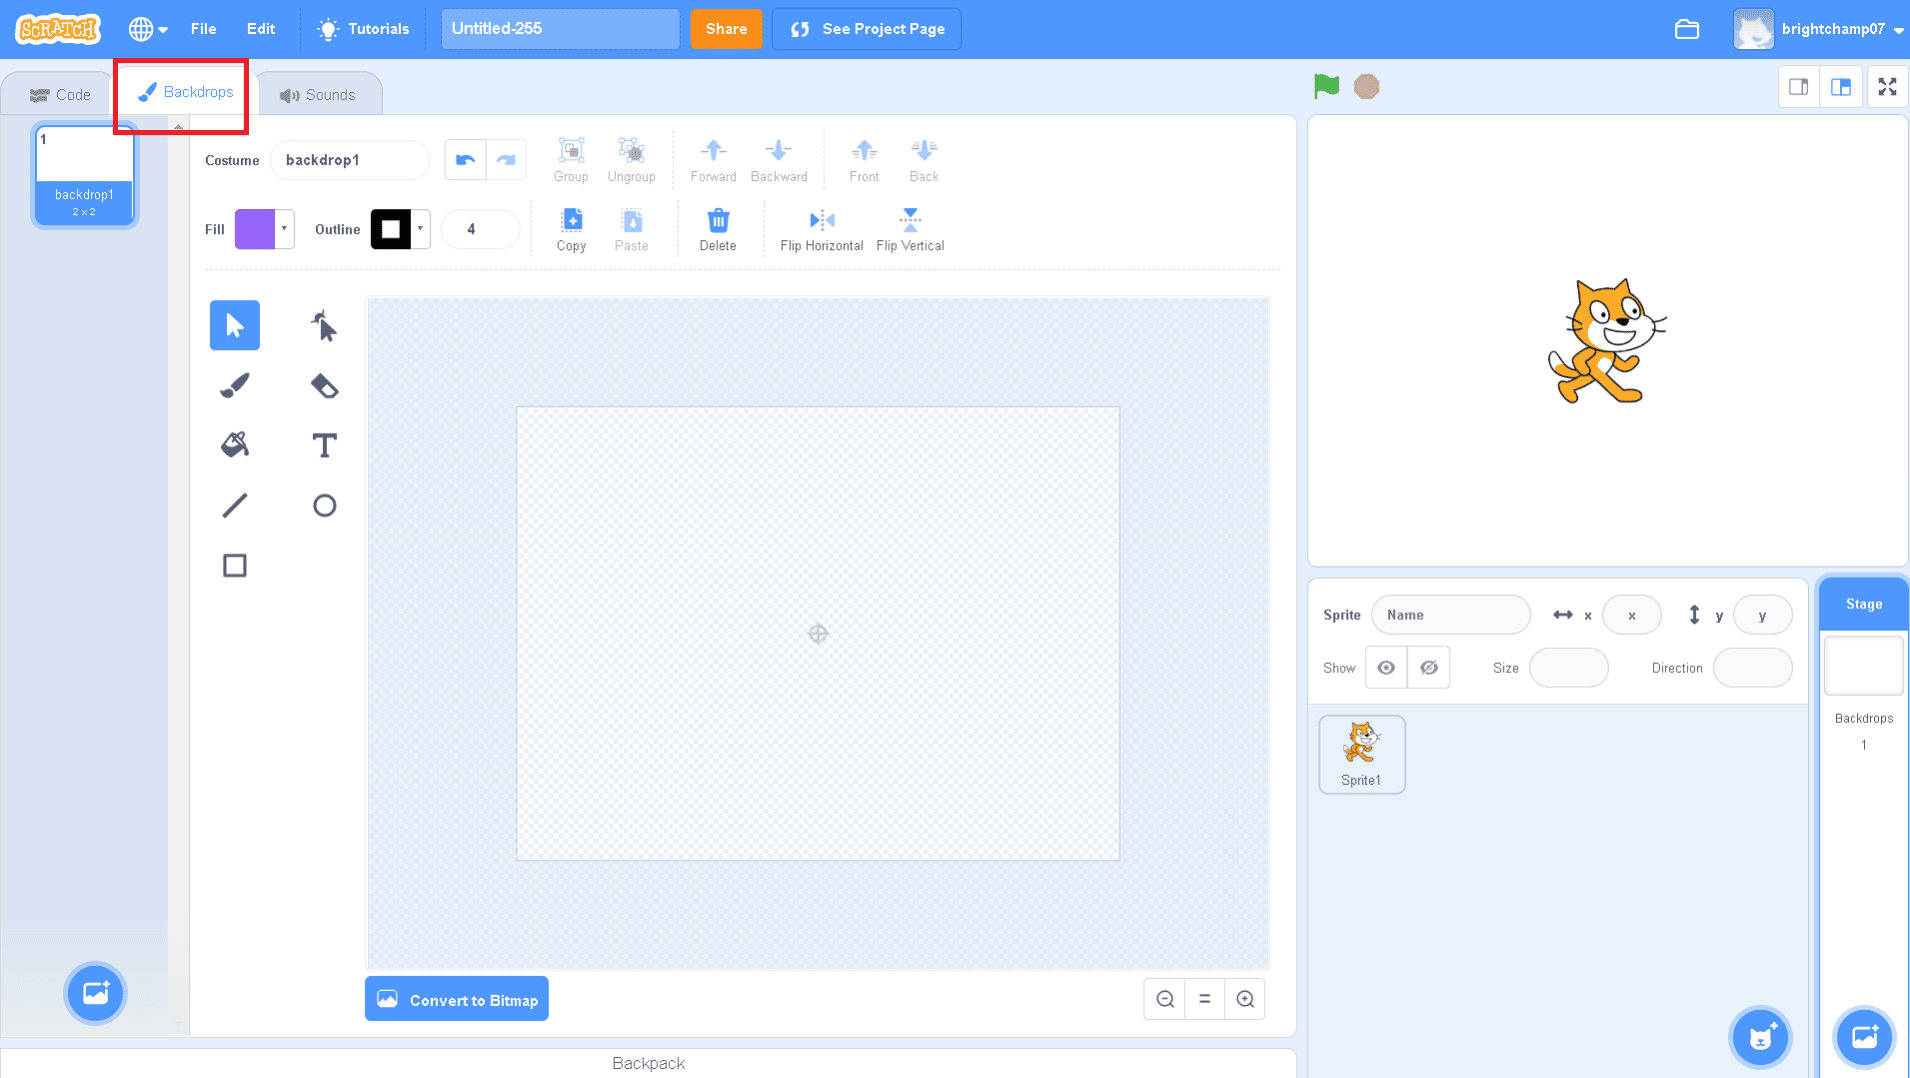
Select the Backdrops option. It’s the second tab from the left in the upper-left corner.
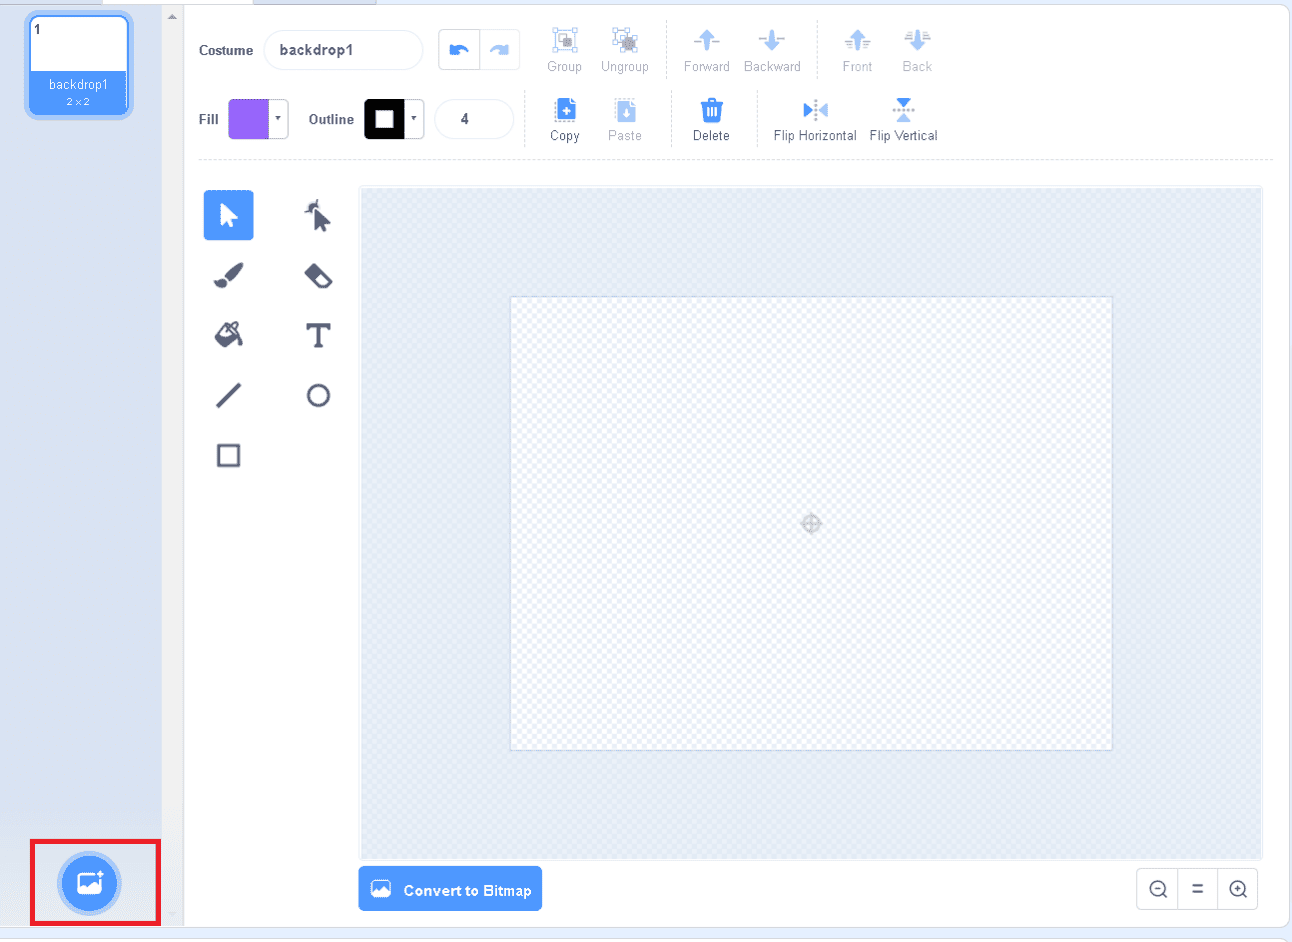
Choose a background. When you click the “Backdrops” tab, all backdrops you’ve loaded are listed in the panel to the left. To rename a backdrop, use the bar above the drawing area next to “Costume” to type a new name for the backdrop.

Insert a sprite into the scene. All of the sprites you’ve uploaded are listed in the upper-right corner below the play area. To add a sprite to the scene, click and drag it into the play area. Drag it to where you want it to go. You can change the location of an object in the play area at any time by clicking and dragging it.
Increase or decrease the size of a sprite. To change the size of a sprite, enter the sprite’s percentage number in the box next to “Size.”
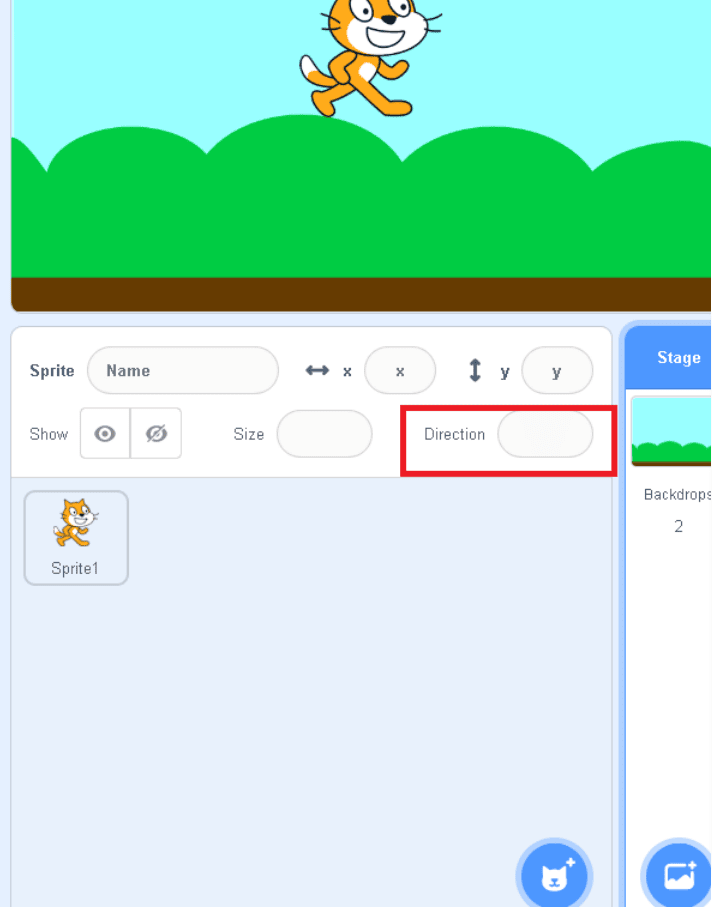
A sprite’s direction can be changed. Click the box next to “Direction” to change the direction of a sprite. Then, click and drag the arrow around the compass to point the sprite in the desired direction. To flip him in the opposite direction, click the icon that looks like two arrows pointing towards each other beneath the compass.
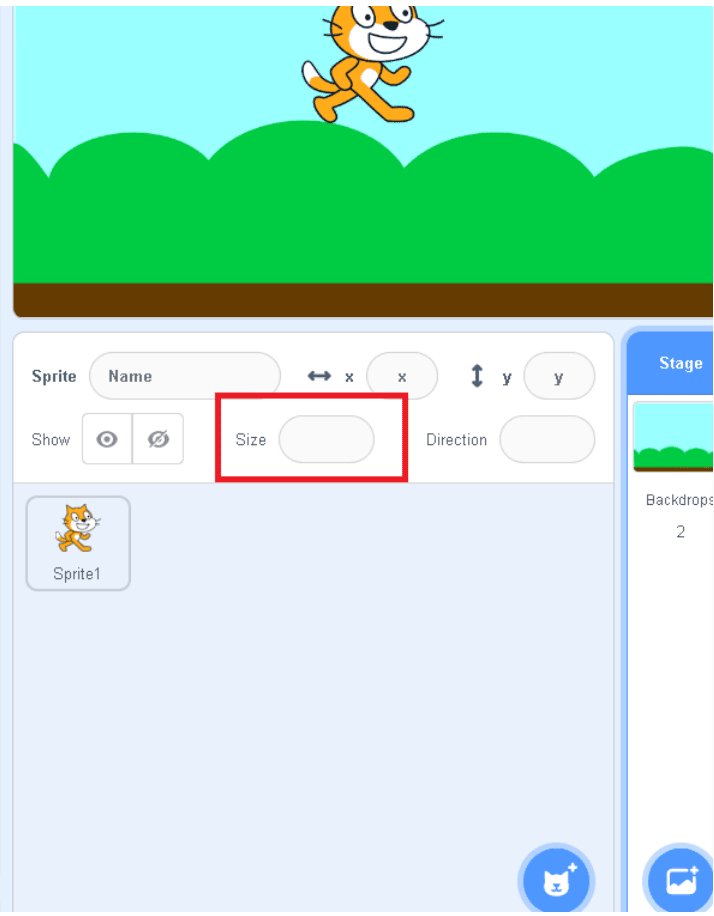
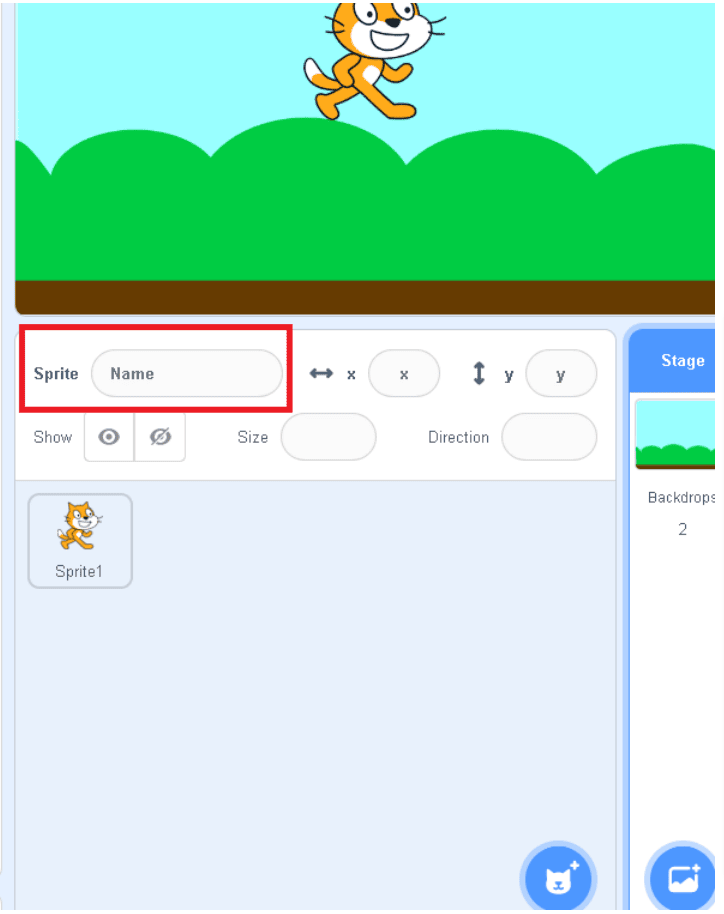
Rename a sprite. To rename a sprite, enter its name in the box next to “Sprite” below the play area.
Creating and Selecting Sound in Scratch
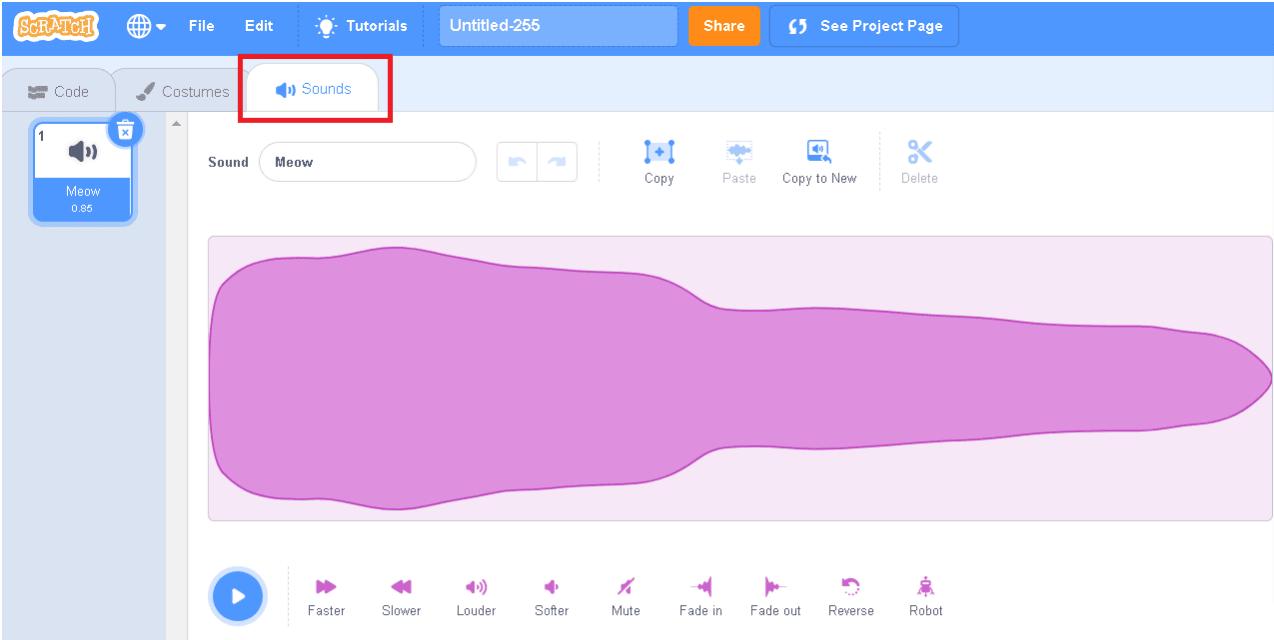
Click the Sounds tab. It’s the third tab at the top in the upper-left corner.
Click the icon that resembles a speaker. It’s in the lower-left corner when you click the “Sounds” tab.

To browse sounds, use the tabs at the top. You can browse sounds by category using the tabs at the top of the Sounds menu.

Hover over the play icon to hear a sound preview. Each sound option has a purple icon in the upper-right corner.

To select a sound, click on it. This opens the sound editor and loads the sound in the panel to the left.
Hover your mouse over the speaker icon in the lower-left corner to upload your own sound. Then, on the right, click the icon that looks like a trey with an arrow pointing up. Click the Open button after selecting a sound file.
Scratch accepts.wav and.mp3 files. Hover the mouse cursor over the speaker icon in the lower-left corner to record your own sound. Then, click the microphone-shaped icon. To begin recording, press the record button.
To stop recording, press the stop button. To see a preview of the recording, click the play icon. To select the starting and stopping points of the sound clip, click and drag the red bars to the left and right of the sound wave. Then click the Save button.
You can also bring sounds from other projects with you. Open the sound editor in another project, open the backpack, and drag the sound into it.
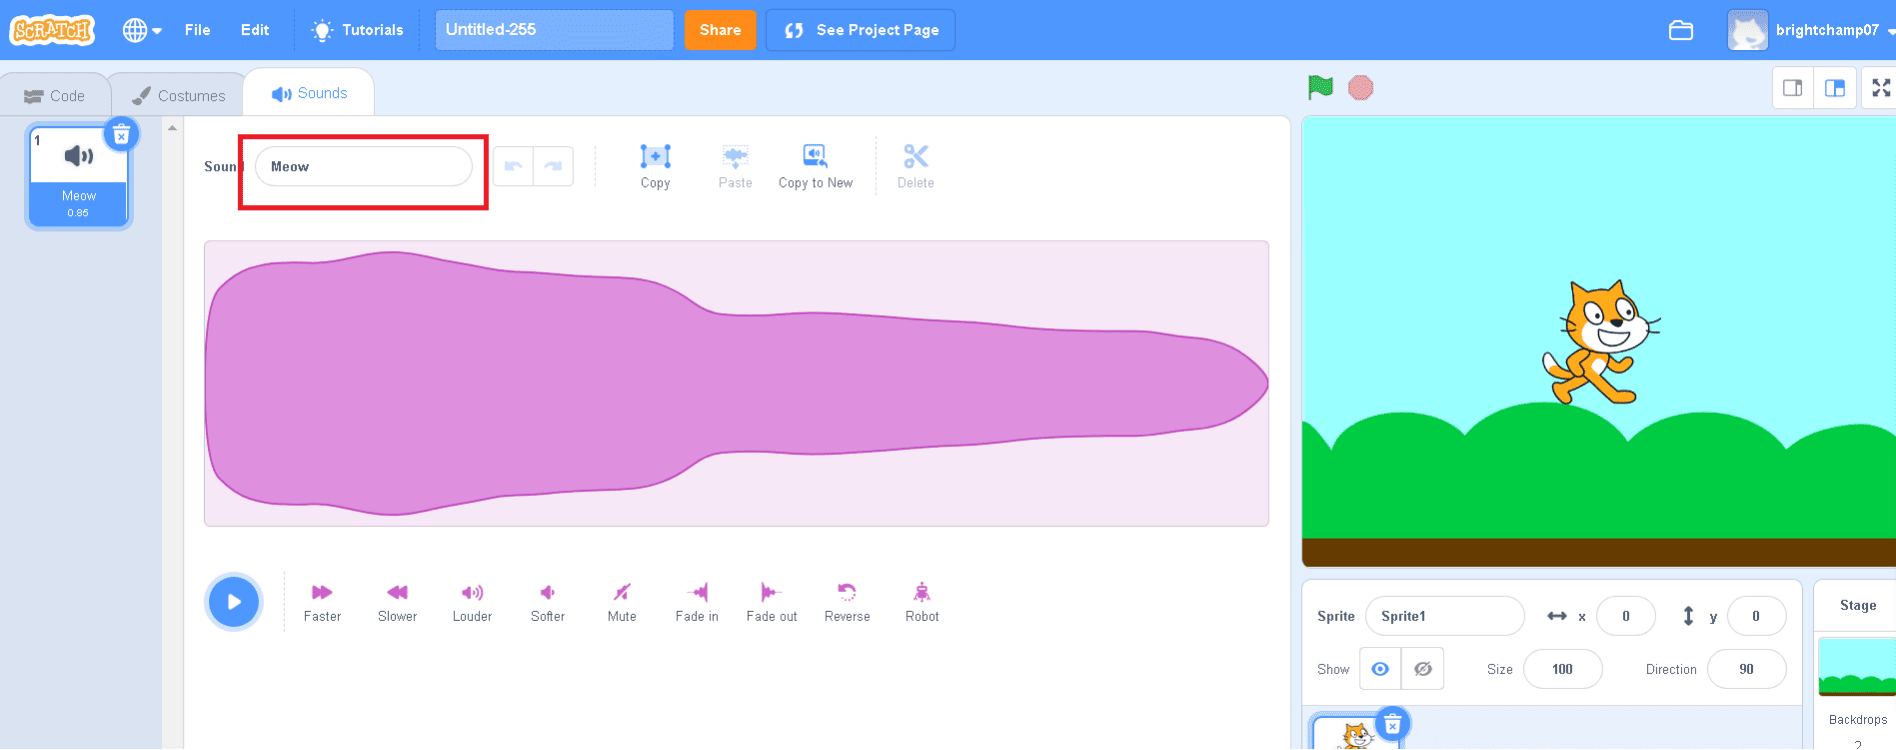
Give the sound a name. To name or rename a sound, type its name in the bar next to “Sound” at the top of the Sound editor menu.
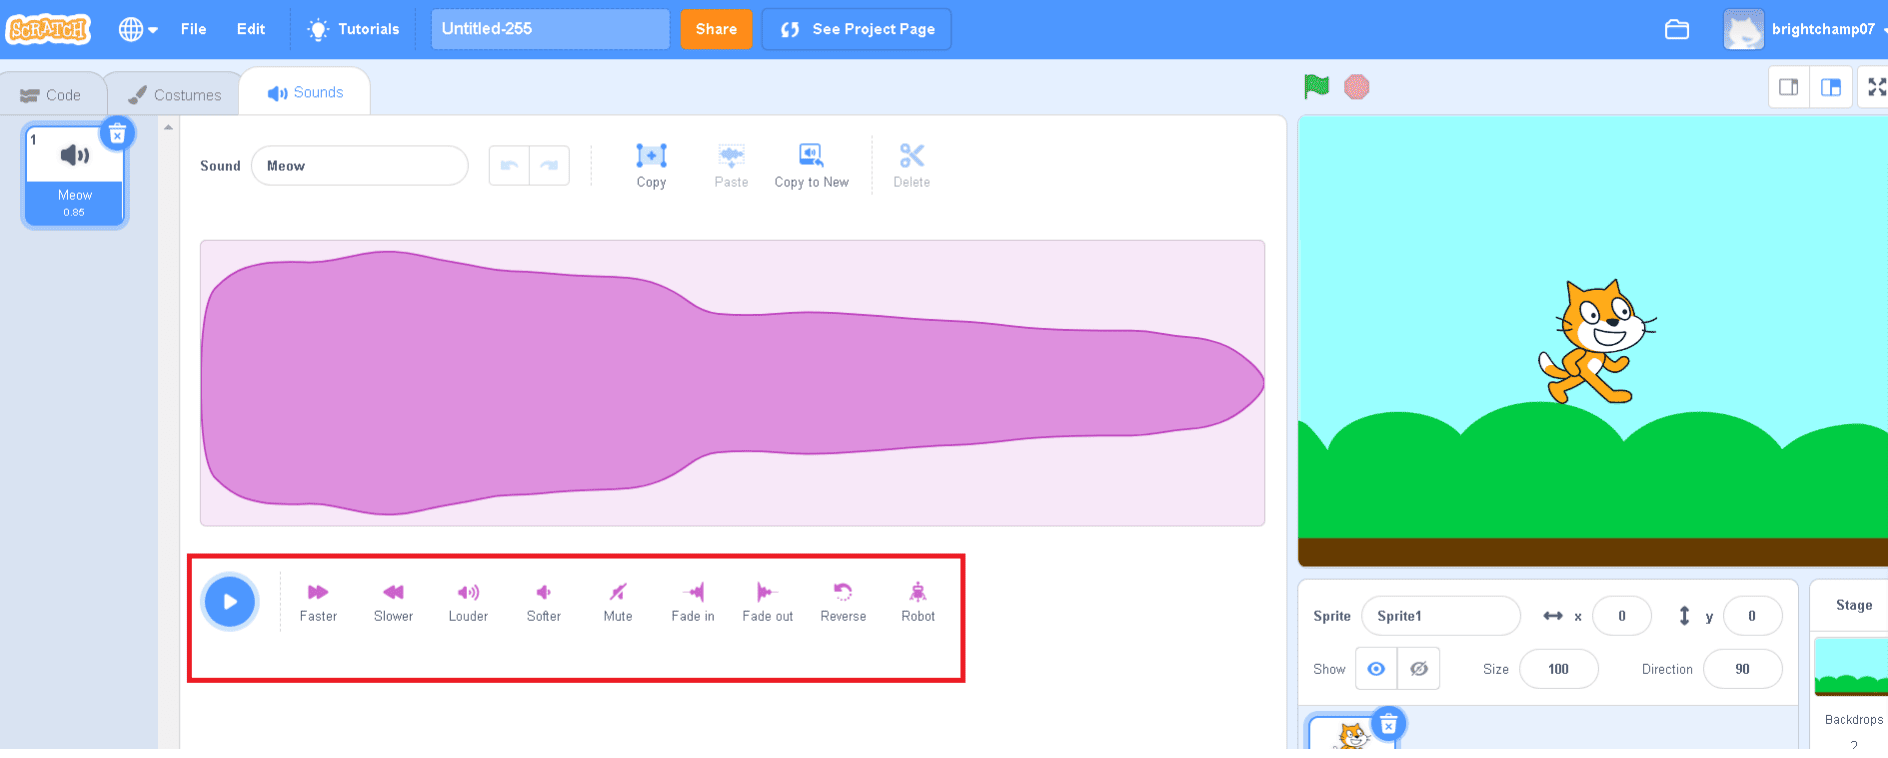
Change the sound. Below the sound wave, there are several options for changing the sound. These are the alternatives:
Faster: This option accelerates the sound.
Slower: This option reduces the volume of the sound.
Louder: Increases the volume of the sound.
Softer: This setting reduces the volume of the sound.
Mute: This reduces the volume to zero.
Fade in: This option causes the sound to begin quietly and gradually become louder. Fade out: Selecting this option causes the sound to fade out at the end. Reverse: This option reverses the sound.
Robotic:This option adds a metallic sound effect.
Scratch Blocks
1. Hat Blocks: Hat blocks are the first blocks in every script. They have a rounded top and a bump at the bottom, allowing you to only place blocks beneath them. The Scratch editor contains eight Hat blocks, six of which are in the Events category, one in the Control category, and one in the My Blocks category (if one has created a custom block).
2. Stack Blocks: The main commands are carried out by stack blocks. They have a notch at the top and a bump at the bottom, allowing blocks to be placed above and below them. The most common block shape has 62 Stack blocks.
3. Boolean Blocks: Boolean blocks are either true or false conditions. Consider them “yes-no” questions. For example, if you asked a computer, “Does 1 + 2 equal 3?” it would respond with “True” or “False.” There are 14 of these hexagonal-shaped blocks
4. Reporter Blocks: The values are represented by reporter blocks. Reporter blocks can contain both numbers and strings. It’s like asking a friend, “What is 1+ 2?” and getting the answer “3”. It can also provide information about a variable. For example, if you ask them, “What is your age?” they may respond, “15” There are 34 of these rounded-edged blocks, not counting the theoretically infinite number of Reporter blocks that can be made for each variable and list.
5. C Blocks: C blocks are blocks that have the shape of a letter “C.” These blocks, also known as “Wrap blocks,” loop the blocks within the Cs or check if a condition is true. C blocks are found in the Control category, and there are five of them. C blocks can be bumped or capped at the bottom.
6. Cap Blocks: Cap blocks are the blocks that come at the end of scripts. They are shaped with a notch at the top and a flat bottom to prevent any blocks from being placed beneath them. There are two Cap blocks, both of which can be found in the Control category.
Scratch Block Categories
Motion, Looks, Sound, Events, Control, Sensing, Operators, Variables, and My Blocks are the nine categories of blocks. Each category contains blocks that serve a specific purpose. By selecting them, you can also add 11 extension categories to the block list. The block categories are located to the left of the Block Palette, and extensions will appear there once they are added.
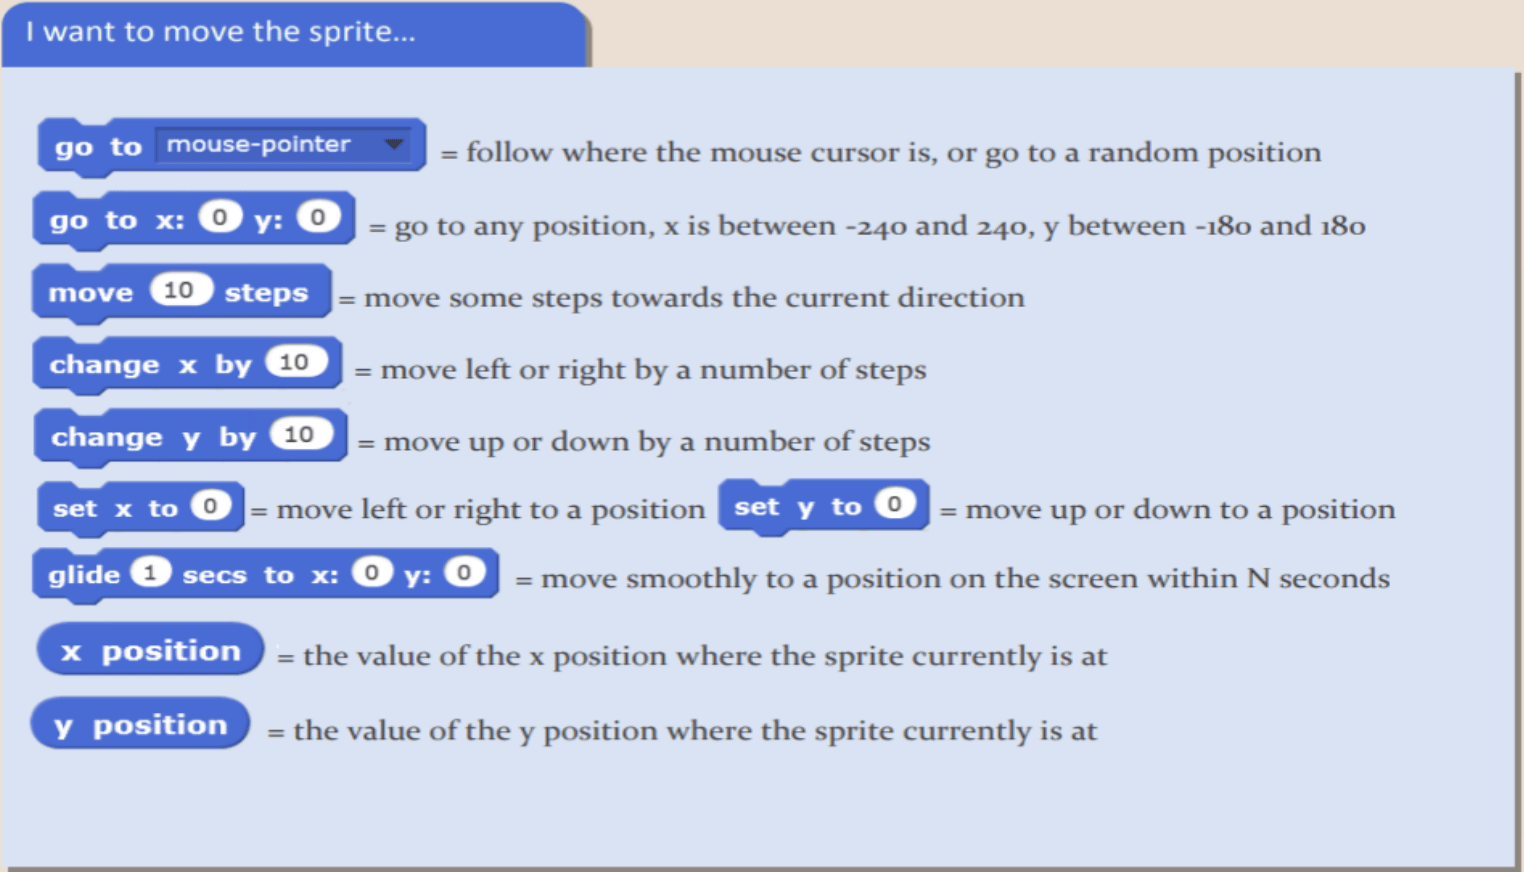
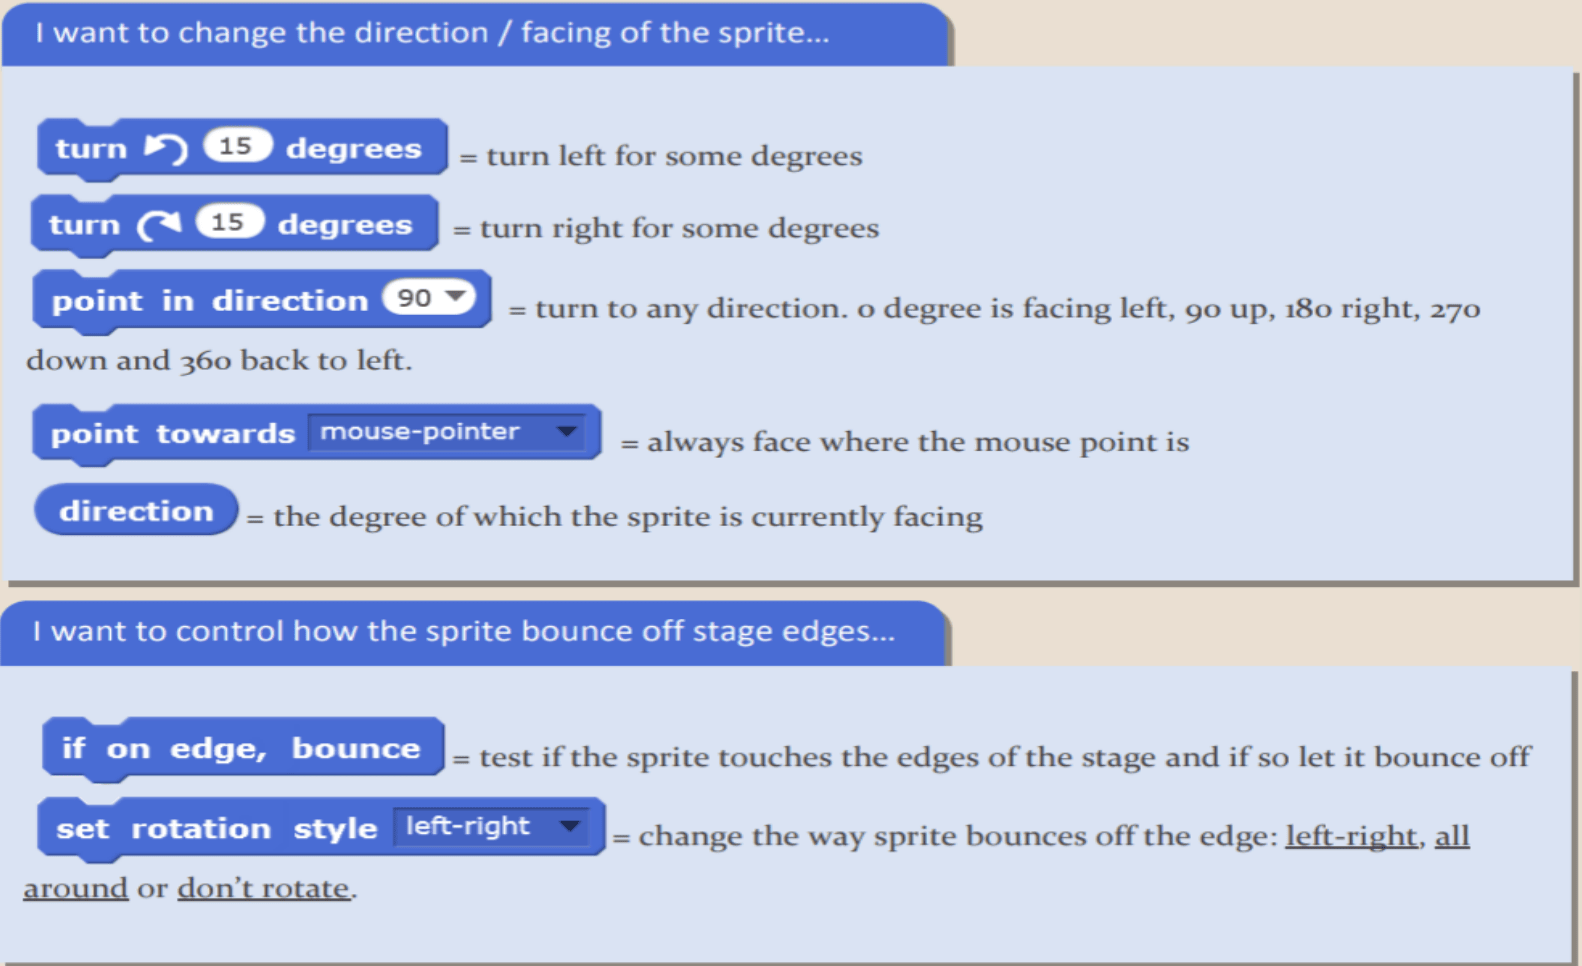
1. Motion Blocks: Motion blocks are the blocks that control the movement of a Sprite. Scratch 3.0 includes 17 Motion blocks. Because the stage cannot move, there are no motion blocks
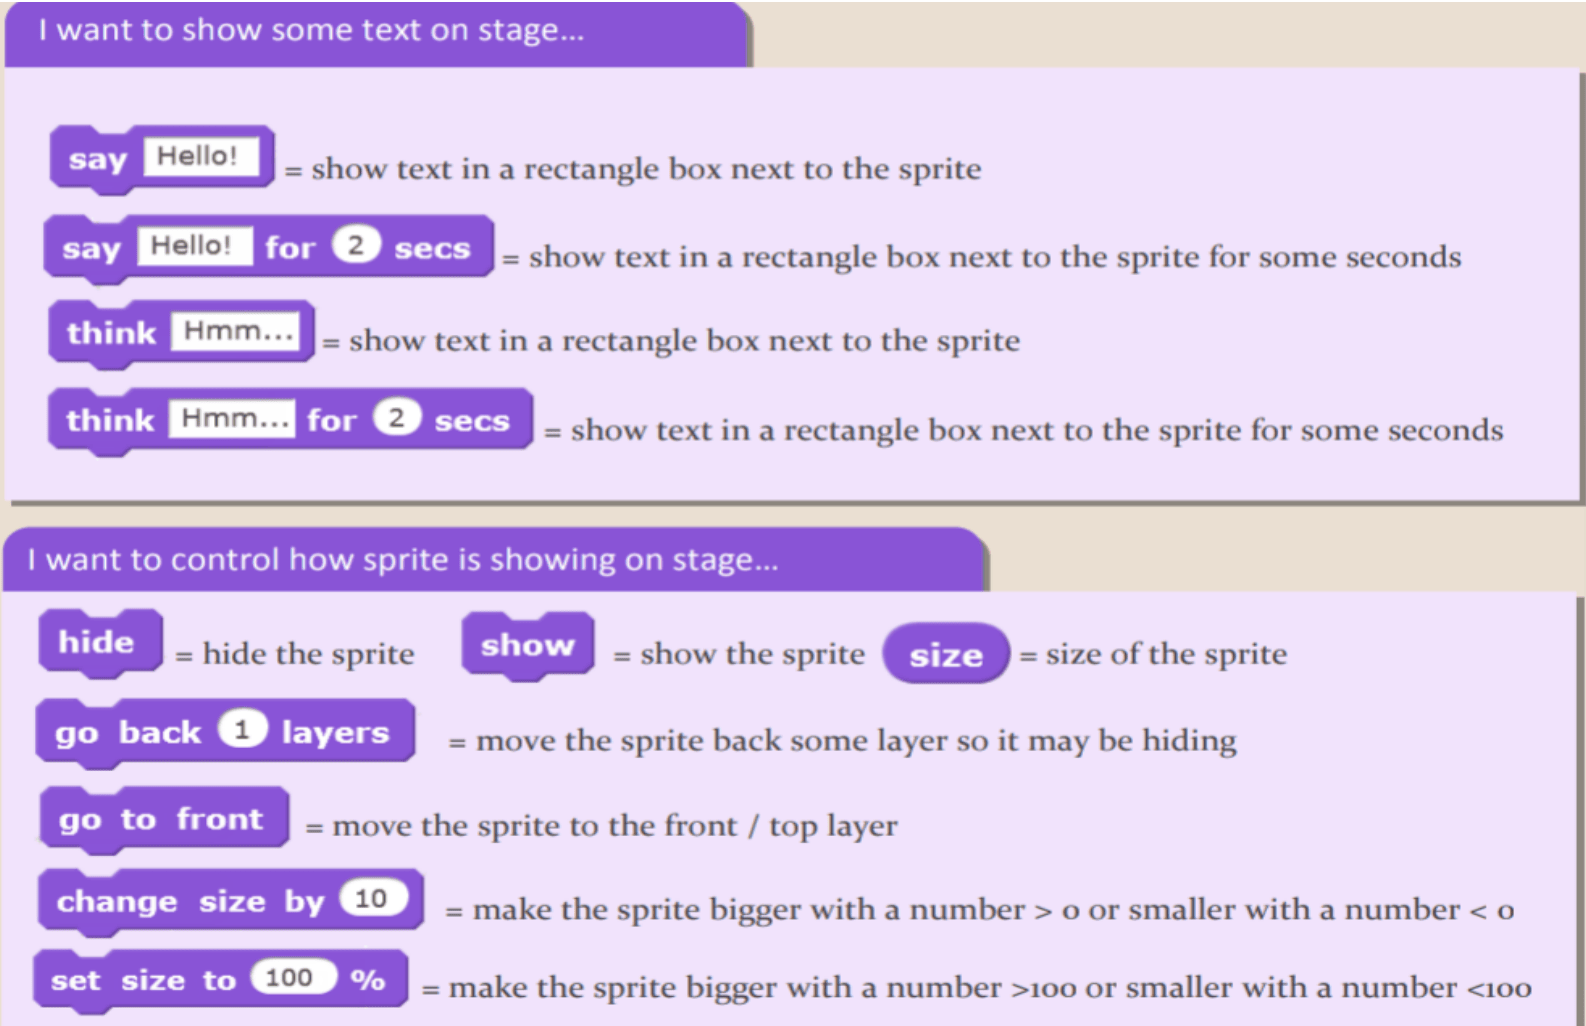
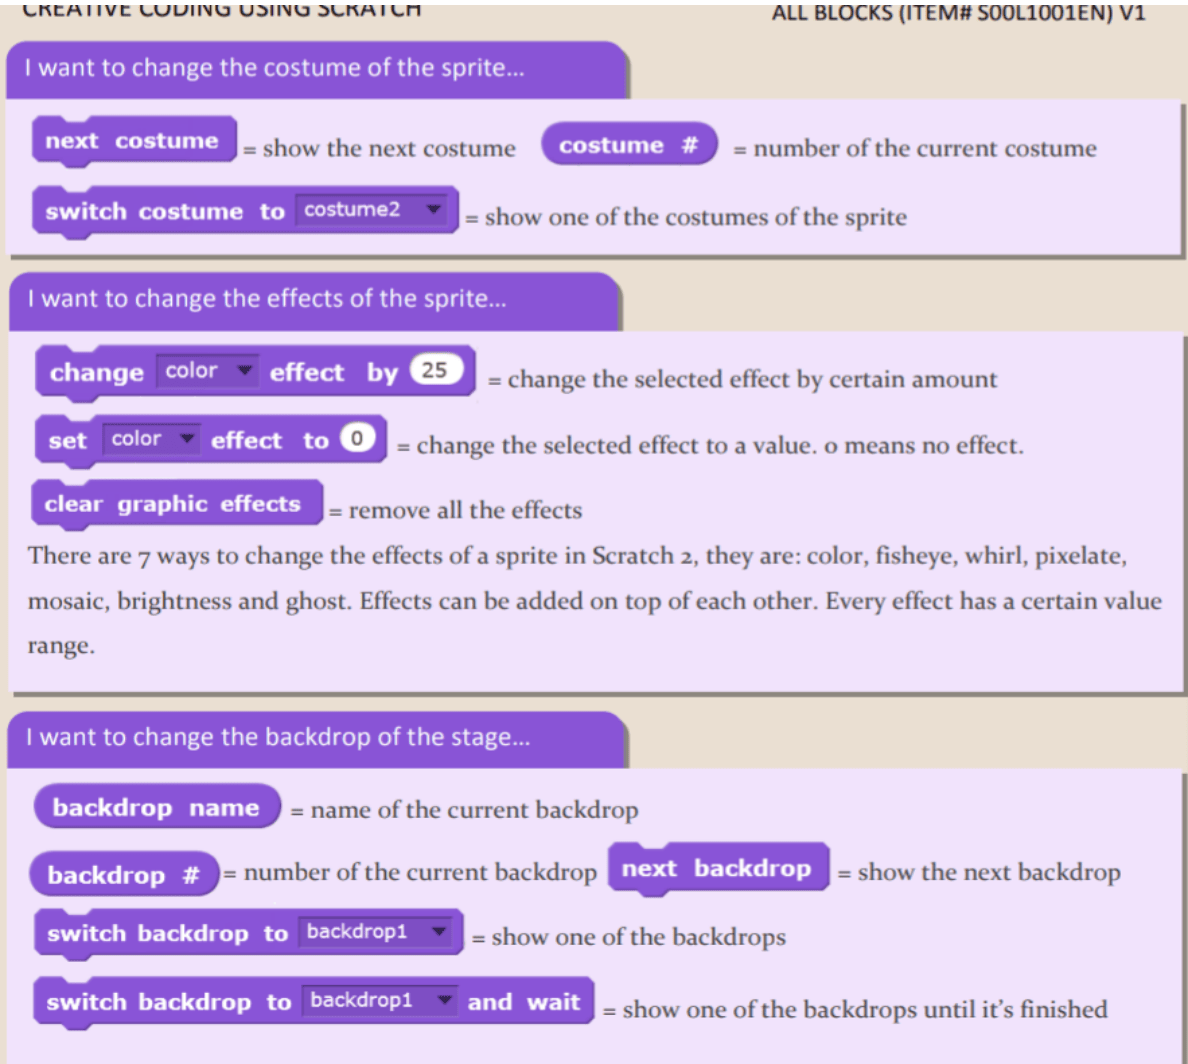
2. Looks Blocks: Looks blocks are the ones that determine how a sprite appears. Scratch 3.0 includes 23 Looks blocks. Three of the 19 sprite Looks blocks have a Stage counterpart.
3. Sound Blocks: The blocks that control sound are known as sound blocks. Scratch 3.0 includes 9 Sound blocks. 3.0’s note blocks have been relocated to the Music Extension.
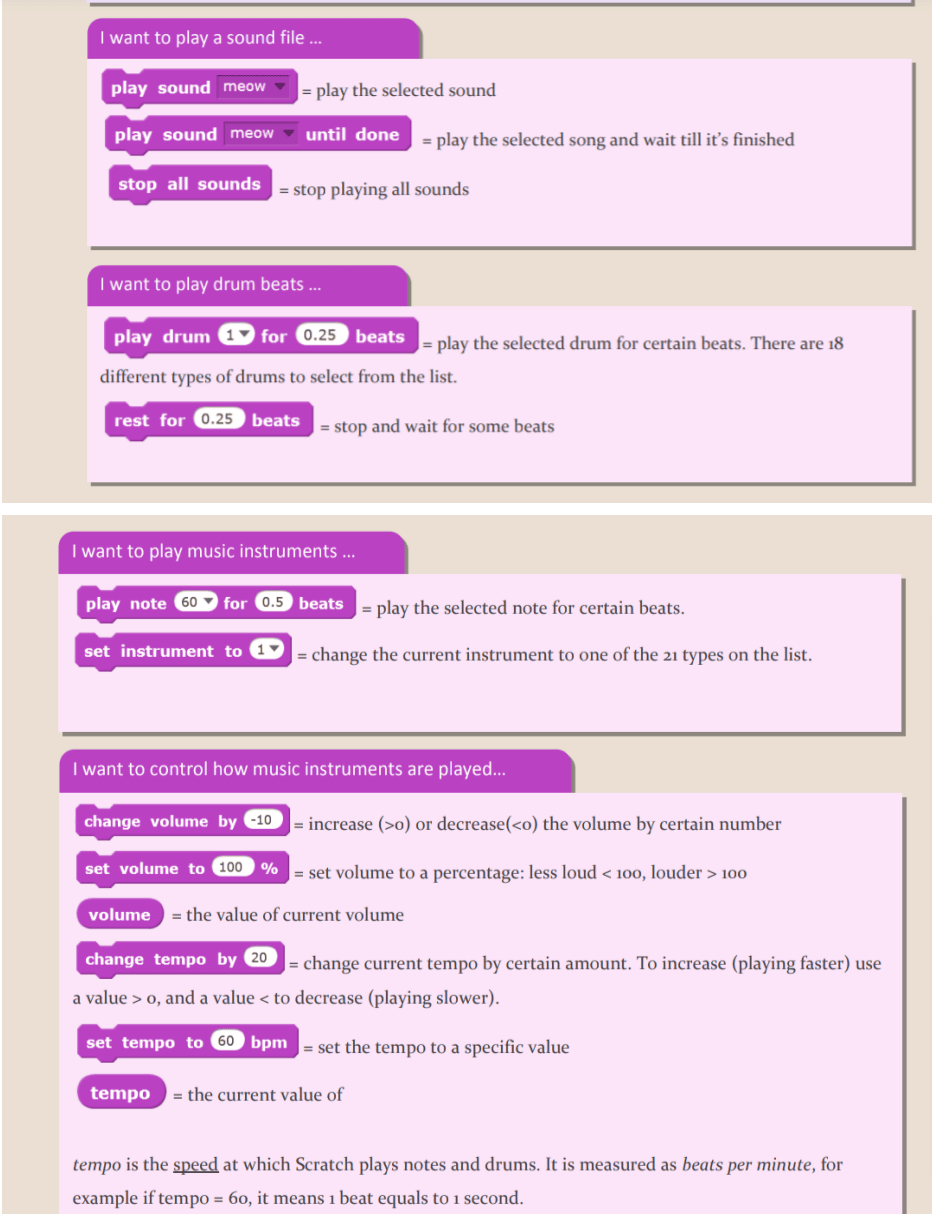
4. Events Blocks: Events blocks are used to control events and the execution of scripts. Scratch 3.0 includes 8 Event blocks.
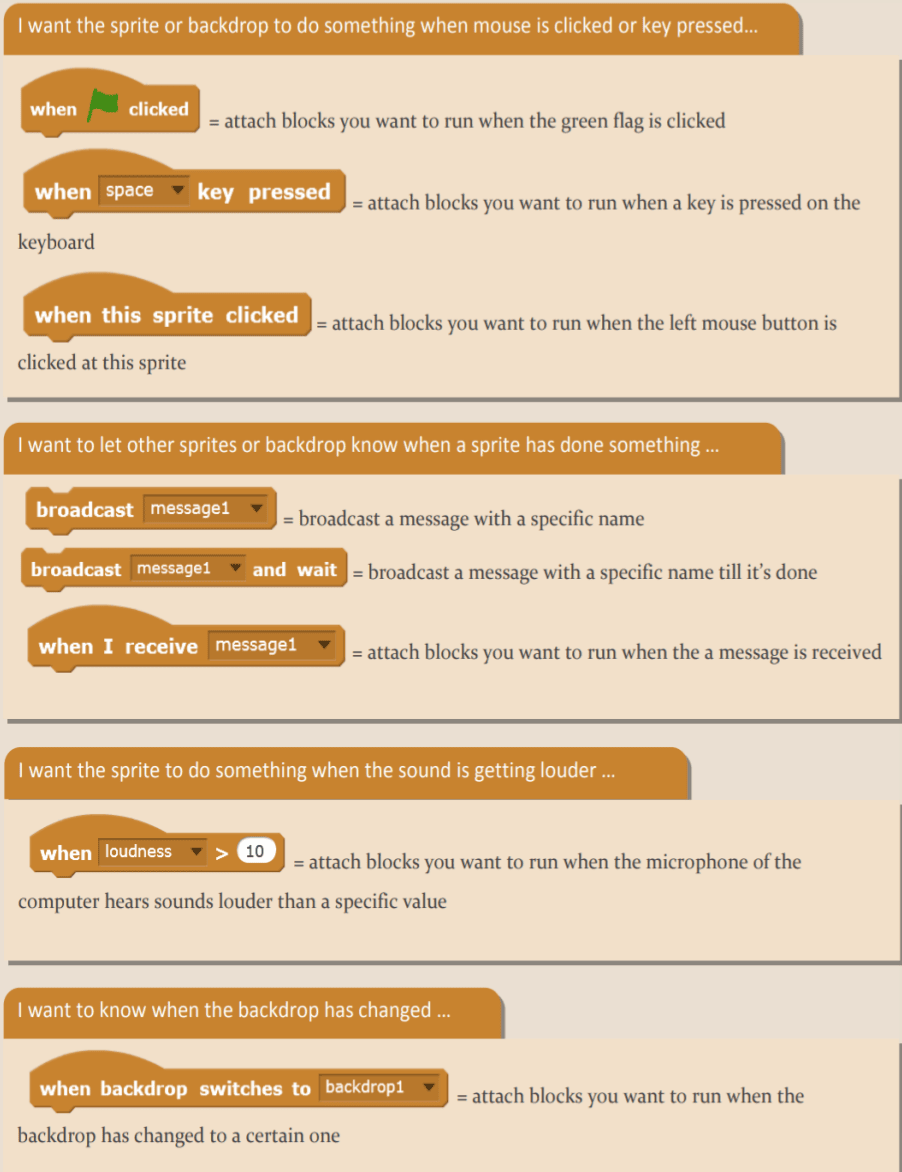
5. Control Blocks: The blocks that control scripts are known as control blocks. Scratch 3.0 includes 11 Control blocks.
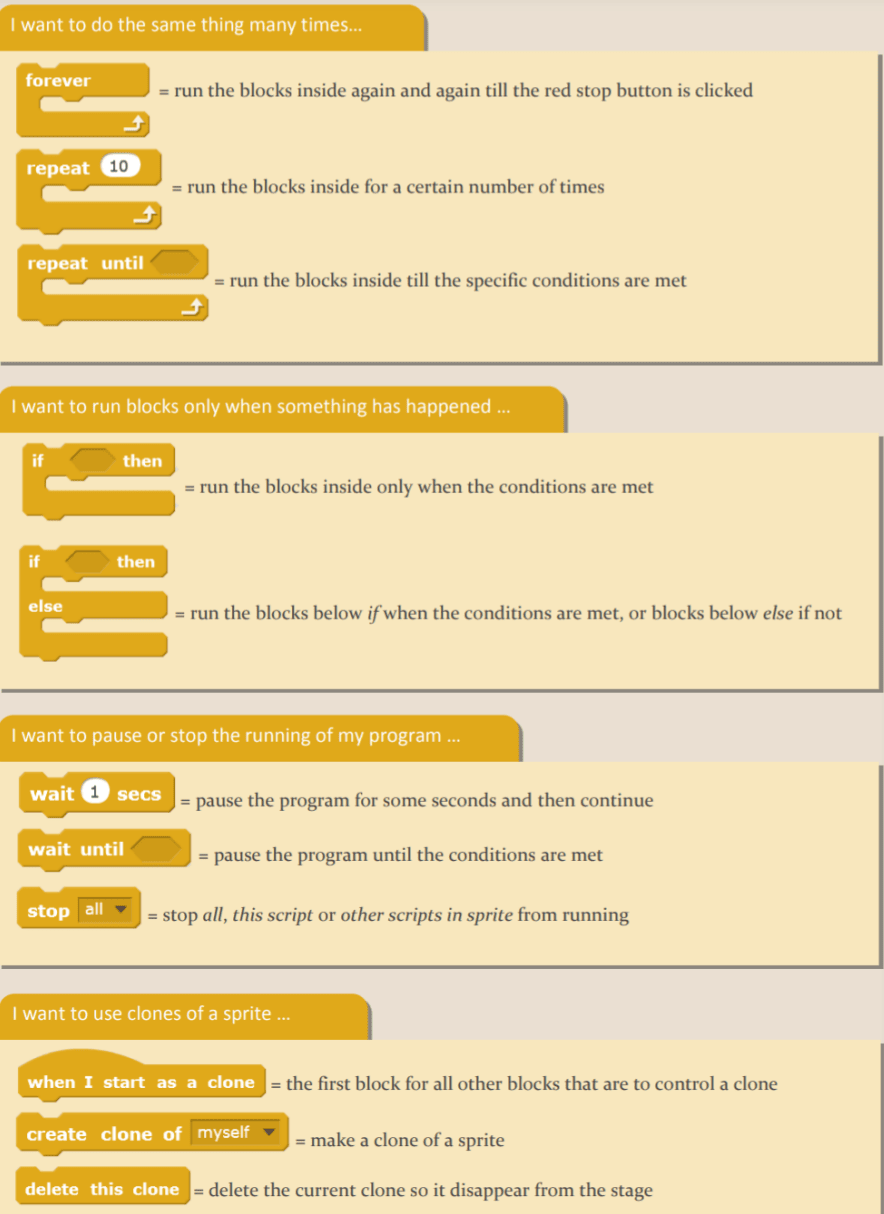
6. Sensing Blocks: The blocks that detect things are known as sensing blocks. Scratch 3.0 includes 18 Sensing blocks.

7. Operator Block: The blocks that perform math functions and string handling are known as operators. Scratch 3.0 includes 18 Operators blocks.
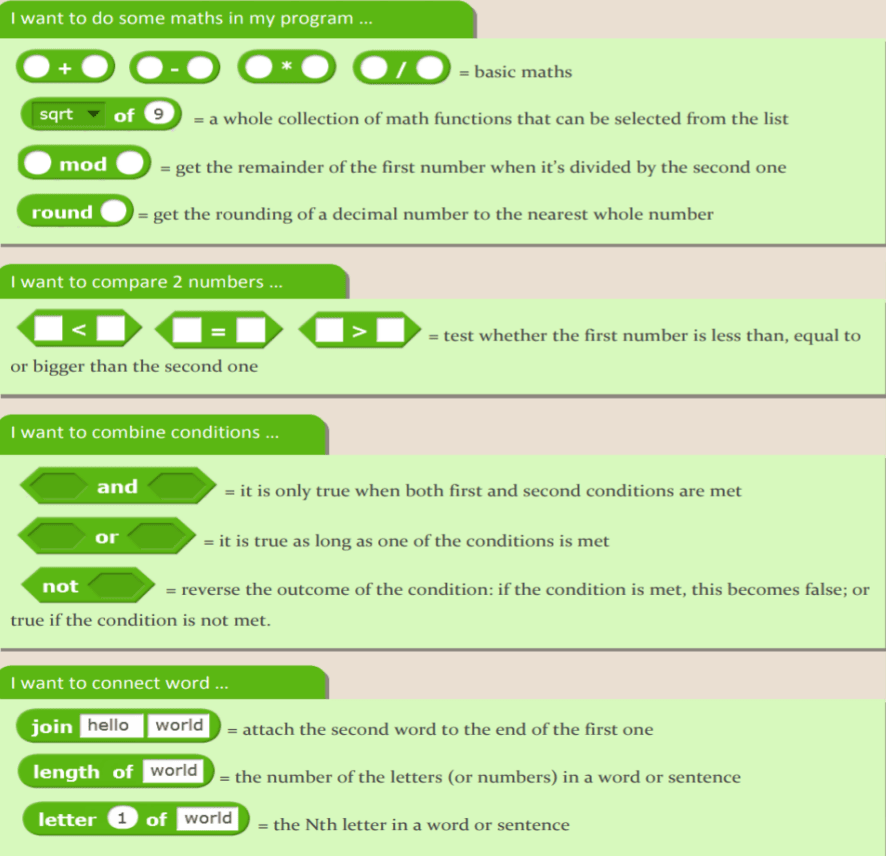
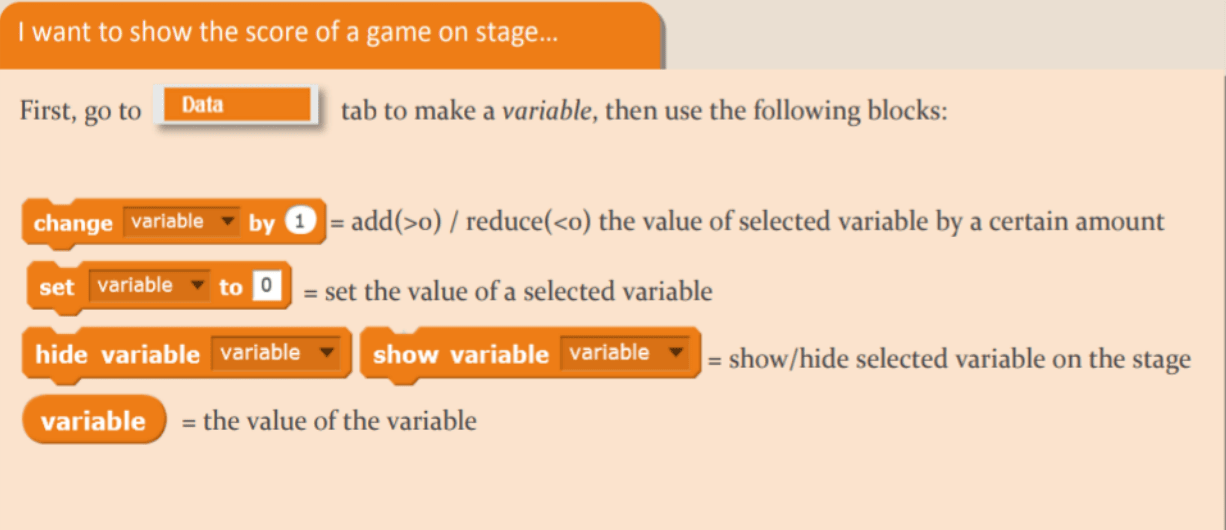
8. Variable Blocks: Variables blocks are used to store variables and lists. Scratch 3.0 includes 5 Variables blocks and 11 list blocks.
Scratch Extensions
A number of extensions are available for Scratch that can be added to the block list. To select an extension, click the blue button to the right of the regular block sections.
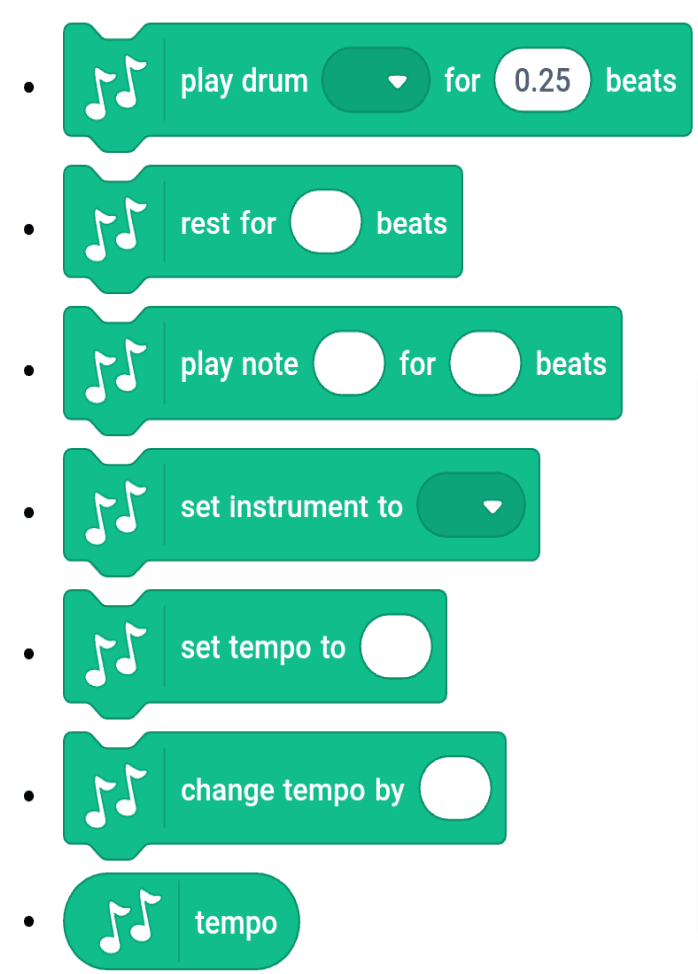
1. Music Extension: The Music extension allows you to play MIDI notes on various instruments. Scratch 3.0 includes seven Music extension block
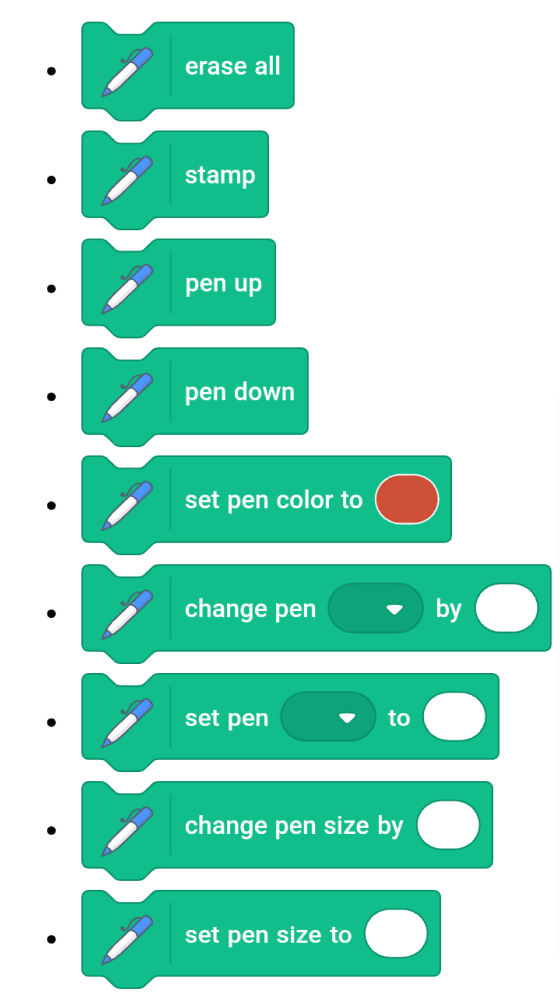
2. Pen Extension: The Pen extension allows one to draw on the stage with the pen. Scratch 3.0 has nine Pen stack blocks:
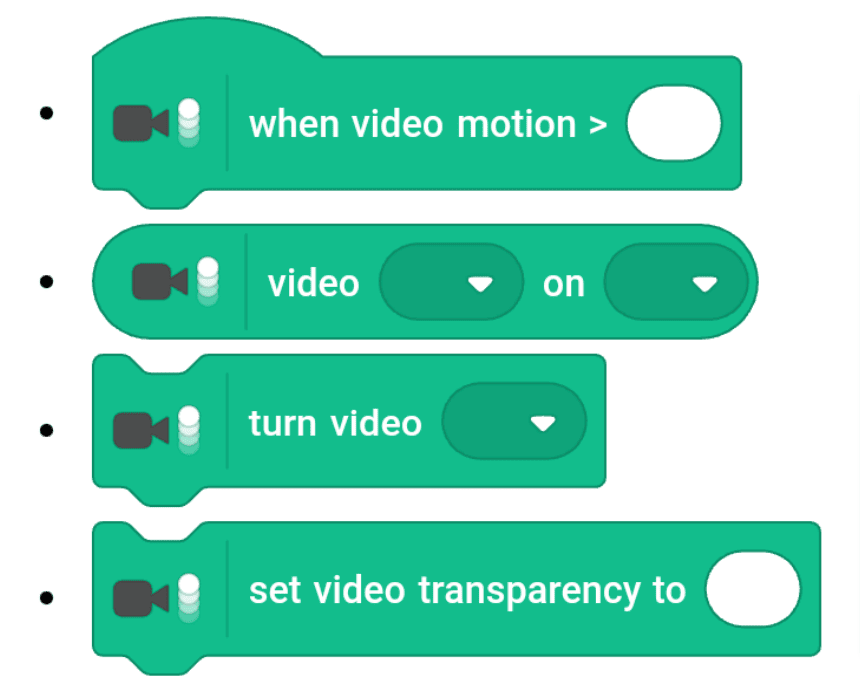
3. Video Sensing Extension: Projects can interact with a webcam using the Video Sensing extension. Scratch 3.0 includes four Video Sensing blocks.
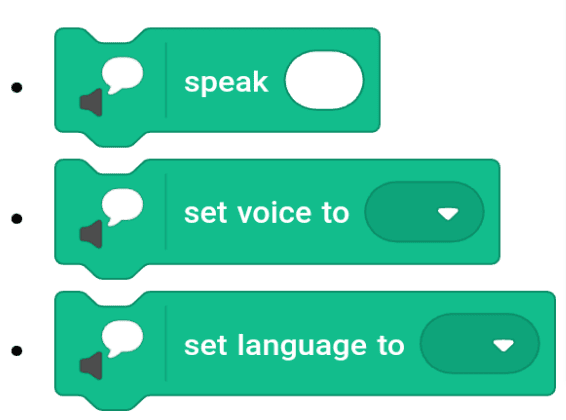
4. Text to Speech Extension: Text can be read aloud using the Text to Speech extension.Three Text to Speech stack blocks are available in Scratch.
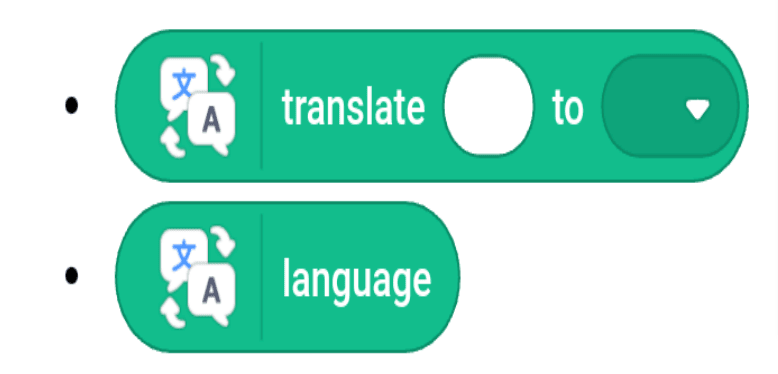
5. Translate Extension: Text can be translated into other languages using the Translate extension. There are two Translate reporter blocks in Scratch:
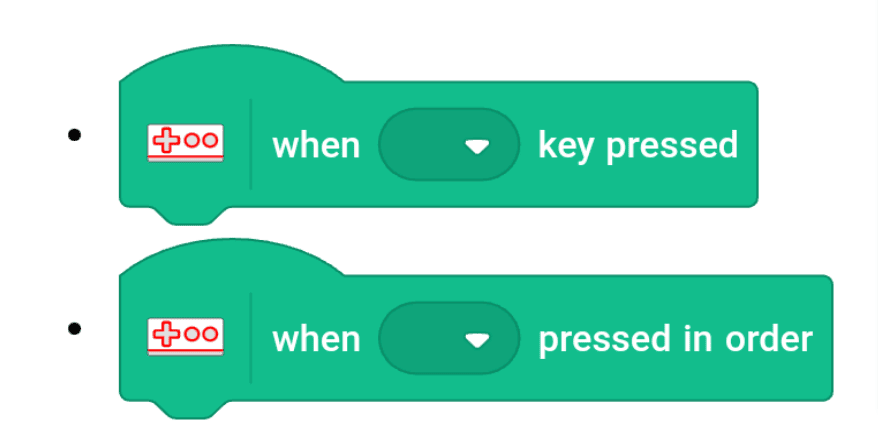
6. Makey Makey Extension: The Makey Makey extension allows projects to communicate with the Makey Makey. There are two Makey Makey hat blocks in Scratch :
7. Micro:bit Extension: The micro:bit extension allows projects to interact with the micro:bit. Scratch contains ten micro:bit blocks.

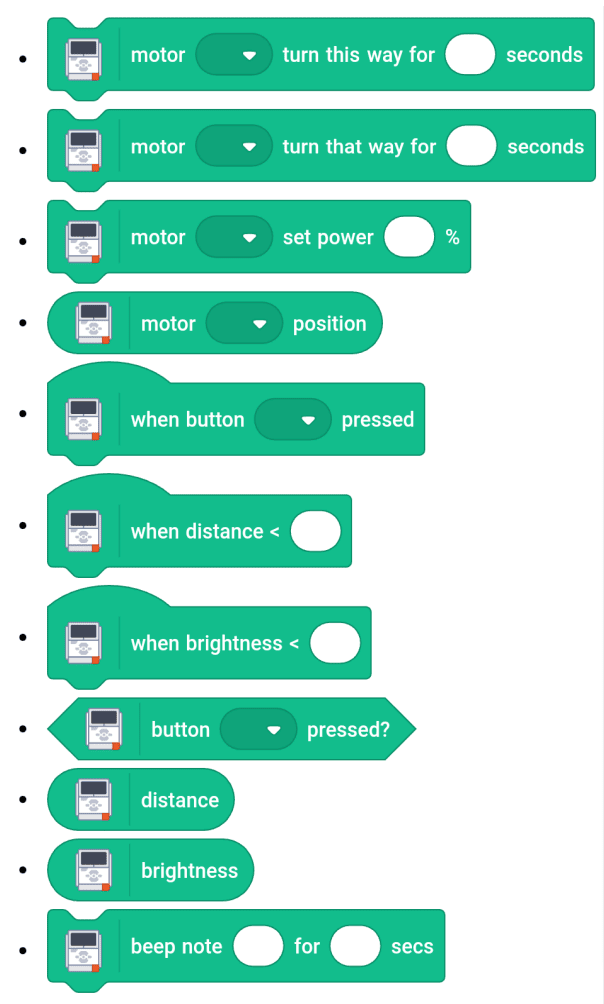
8. LEGO MINDSTORM EV3 Extension: The LEGO MINDSTORMS EV3 extension allows projects to communicate with the LEGO MINDSTORMS EV3. There are 11 EV3 blocks in Scratch 3.0.
9. LEGO BOOST Extension: Projects can interact with the LEGO BOOST using the LEGO BOOST extension. Scratch 3.0 includes 12 LEGO BOOST blocks.
Seven Lego BOOST stack blocks, two reporter blocks, two hat blocks, and one boolean block are included in Scratch 3.0:
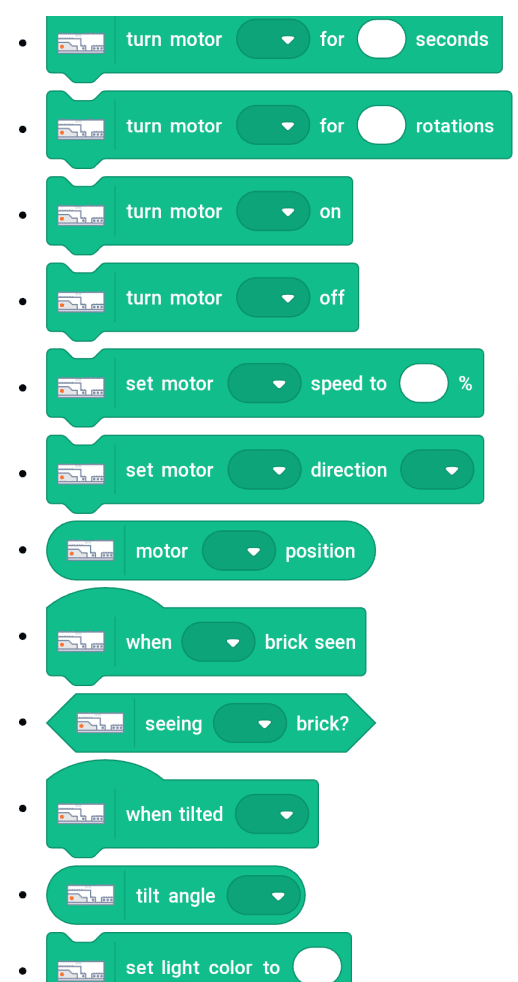
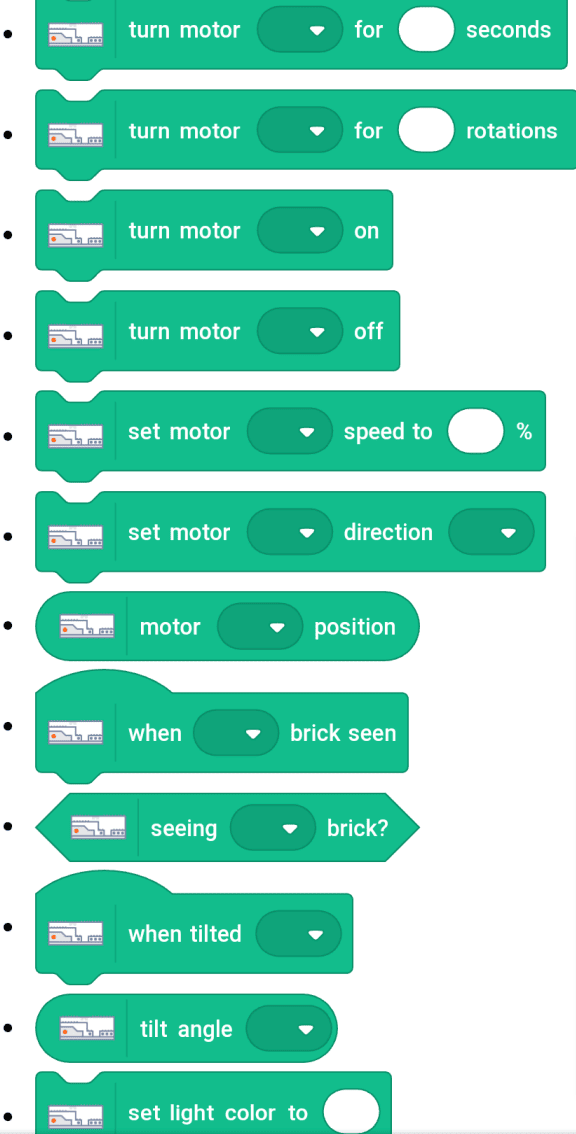
10. LEGO WeDo 2.0 Extension: Projects can interface with the LEGO WeDo Construction Set using the Lego Education WeDo 2.0 extension. Scratch 3.0 has 11 blocks.
Six Lego Education WeDo 2.0 stack blocks, two hat blocks, two reporter blocks, and one boolean block are included in Scratch 3.0.
Creating a Scratch Project
Now, since we have got an idea about blocks, let’s make a basic Scratch project (Fish Aquarium) using some of the blocks we learnt.
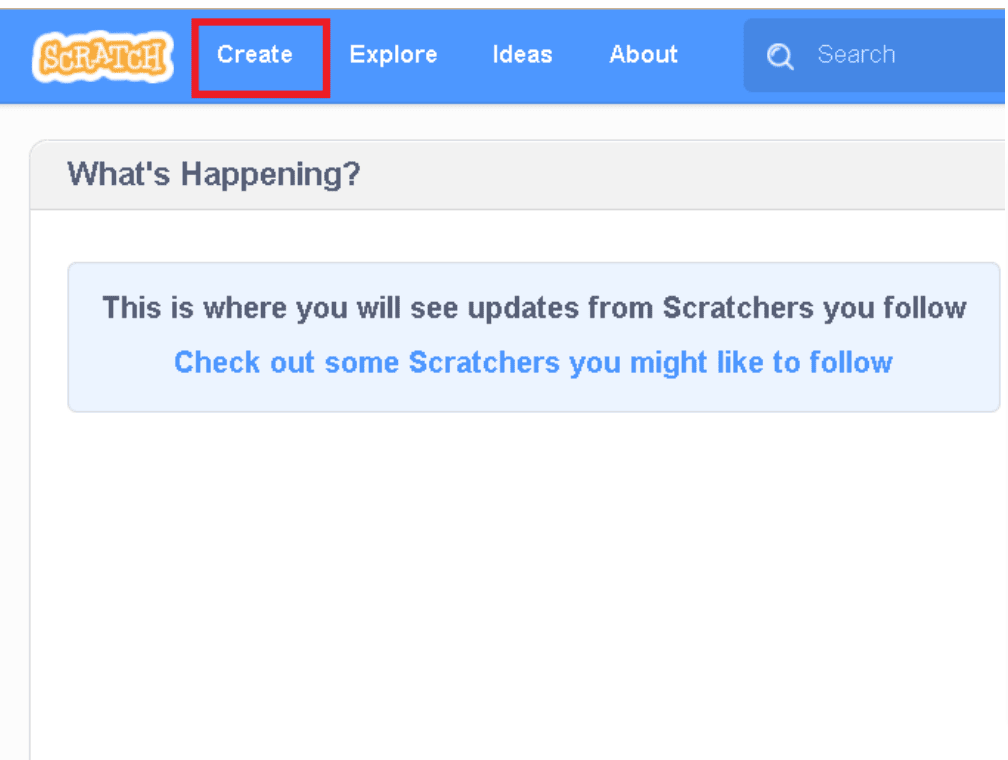
STEP 1: Click on Create Tab on the top left of the screen.
STEP 2: The Scratch Interface opens.
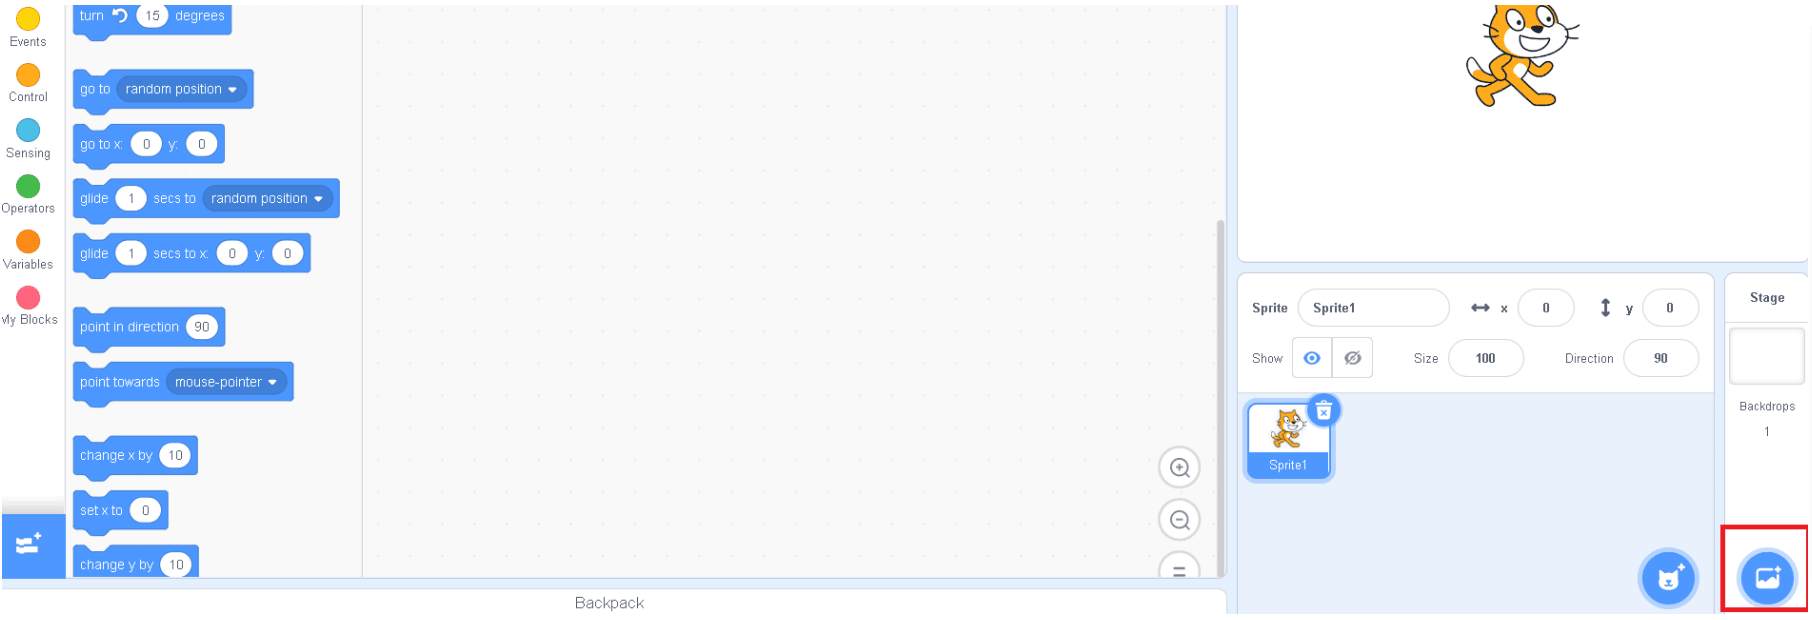
STEP 3: Click on the “Choose the Backdrop” icon on the bottom right corner.

STEP 4: Search for underwater backdrop in the search bar
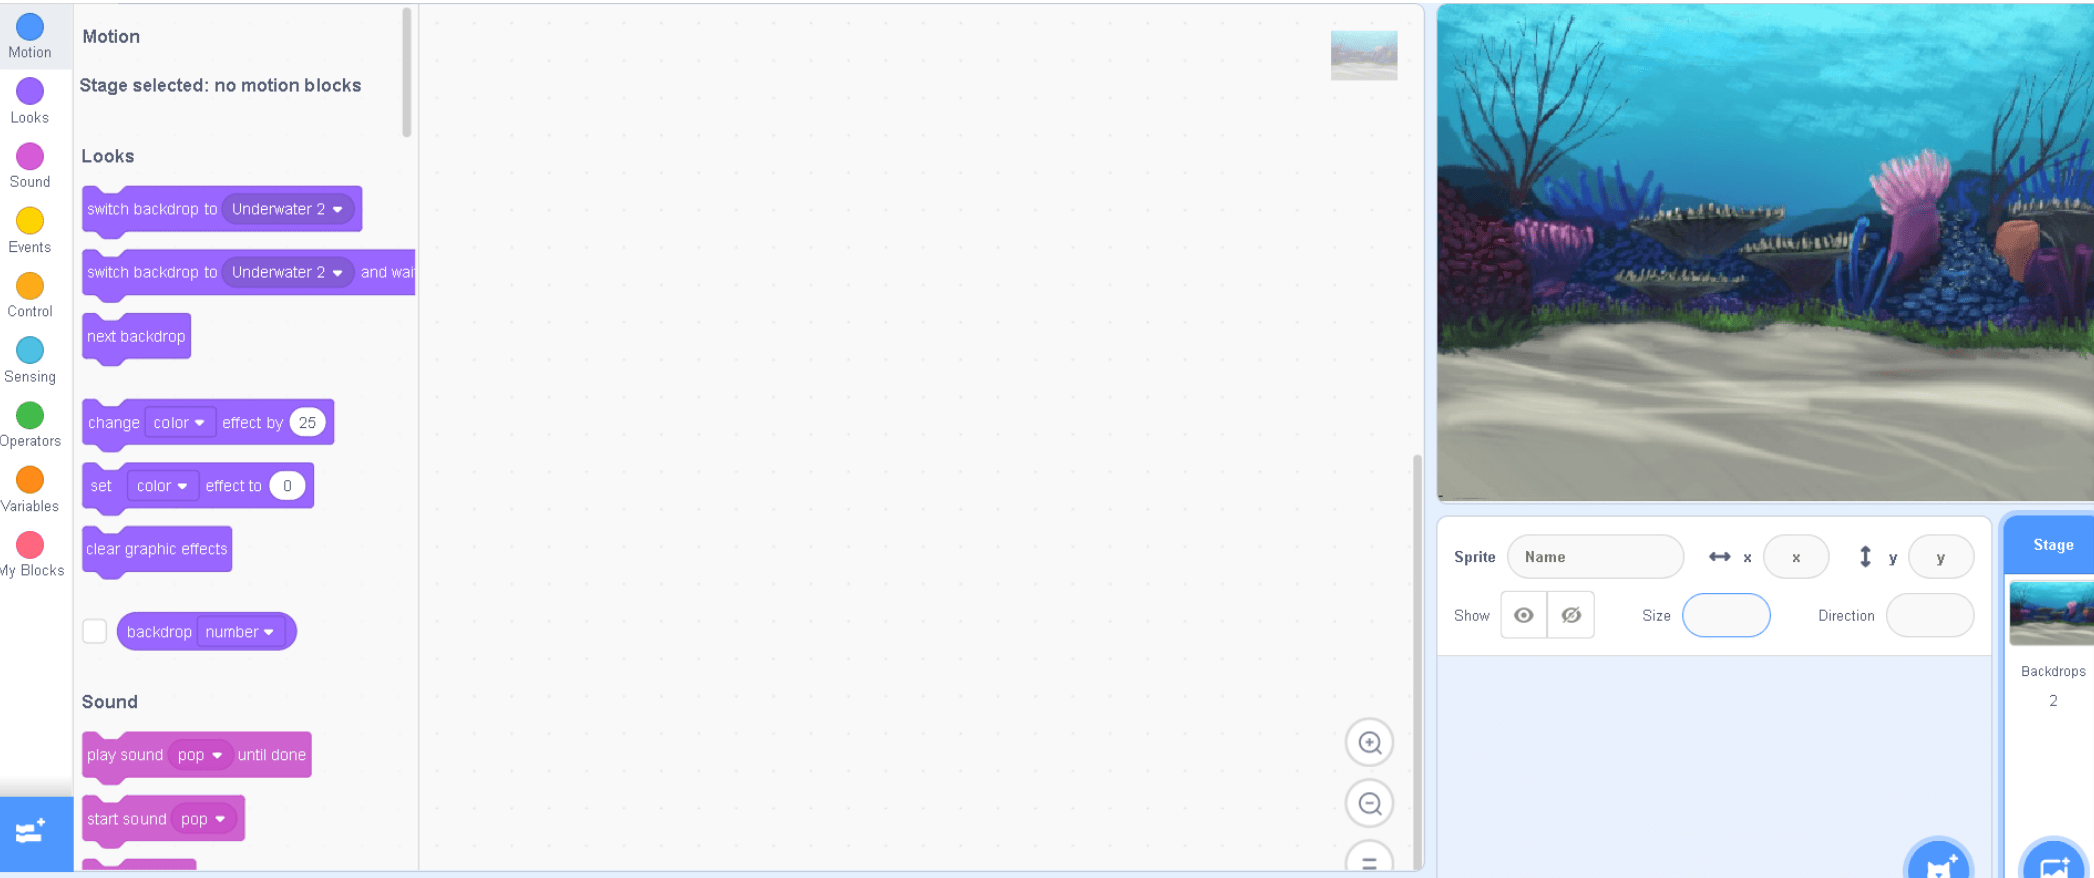
STEP 5: Select either underwater 1 or underwater 2 as the backdrop. After selection you will see that the background of our project changes to the backdrop selected.
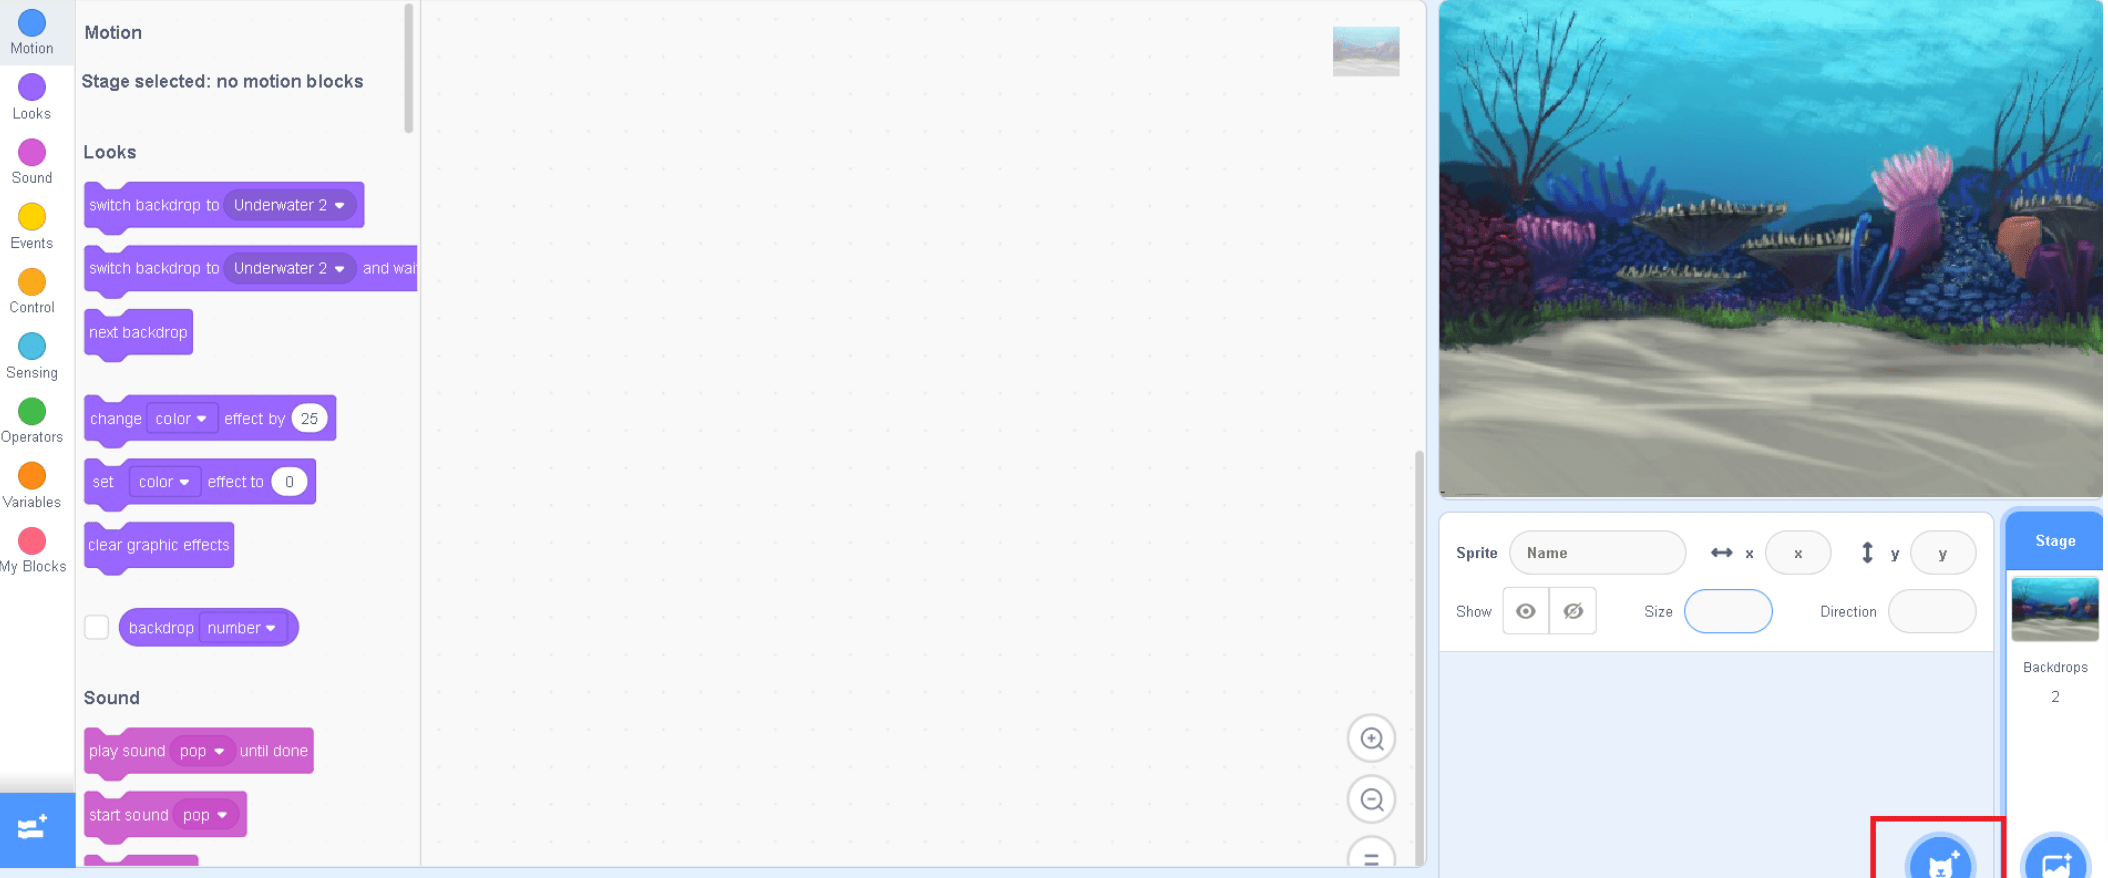
STEP 6: Now click on the Choose a Sprite icon at the bottom right corner beside backdrop icon
STEP 7: The Sprite screen opens.

STEP 8: Search for fish sprite in the search bar.
STEP 9: Select any of your desired fish sprites.
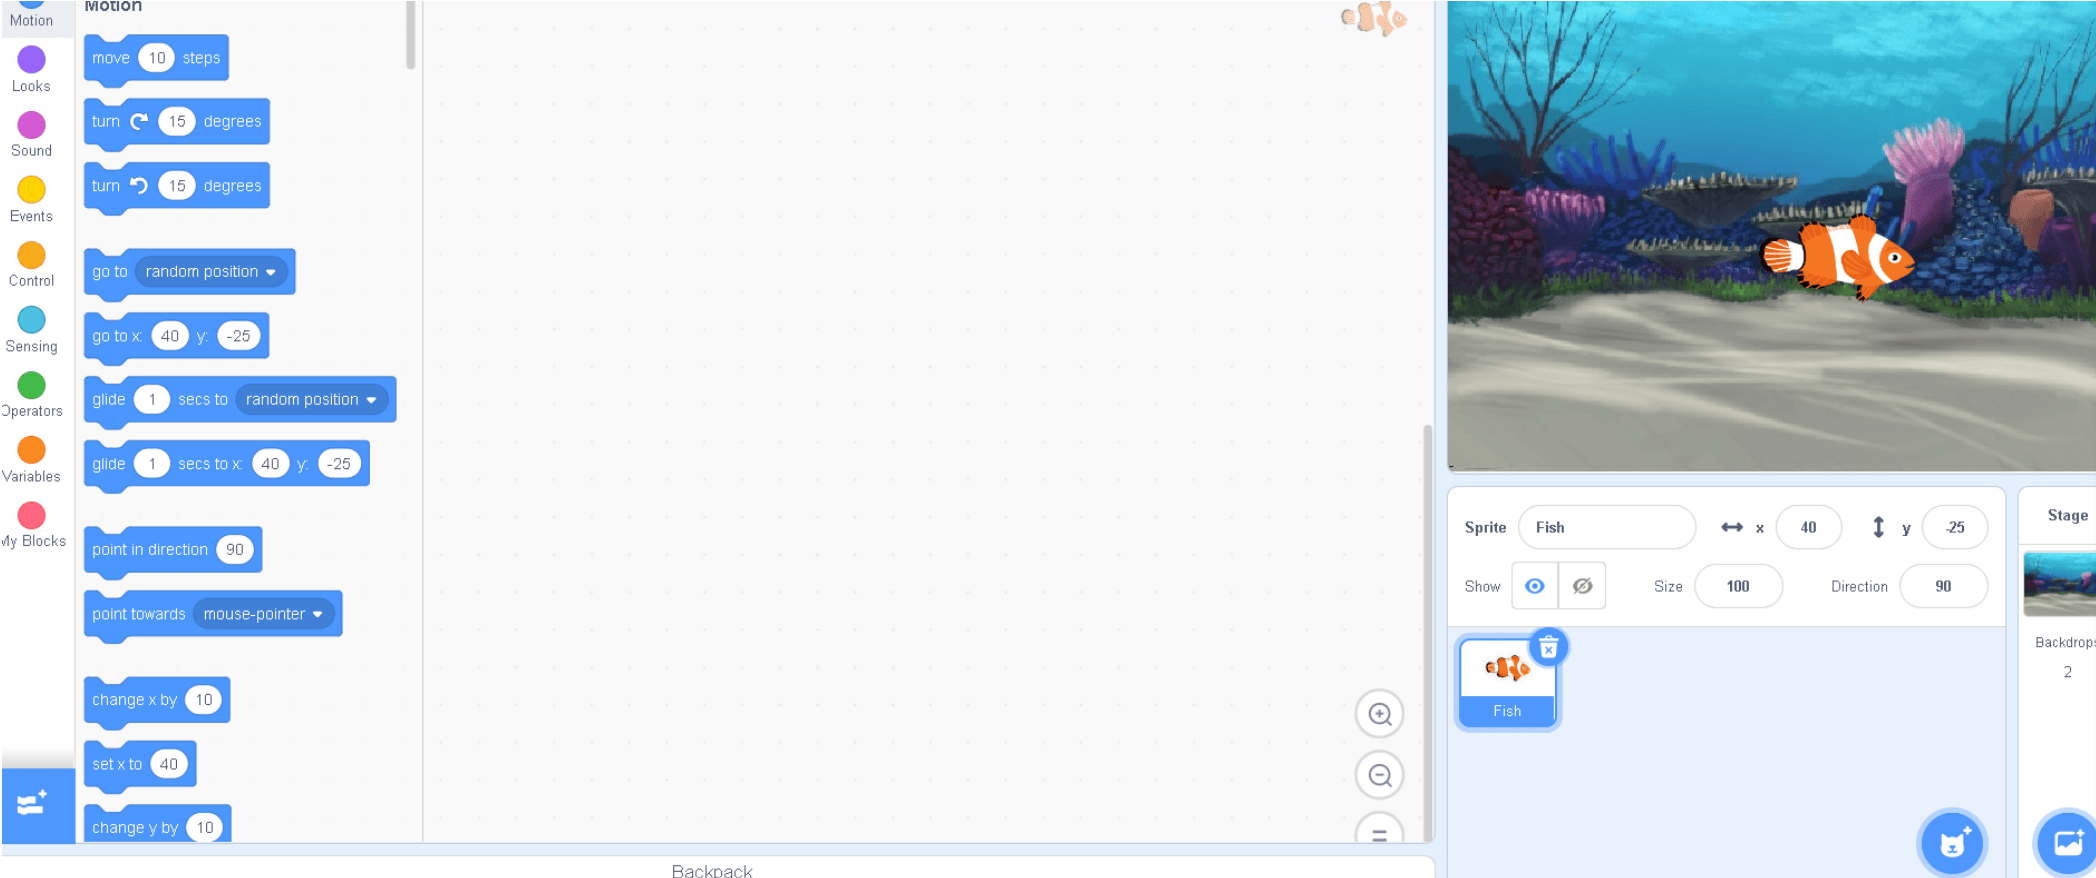
STEP 10: The fish appears on the test screen area.
STEP 11: Select the yellow event button and drag the “When Green Flag clicked” to the scripting area.
STEP 12: Go to orange button which says Control and drag the forever block and place it below the when green flag clicked
STEP 13: Now go to the motion button and drag the “move 10 steps” block and ”if on the edge bounce” block to the scripting area.
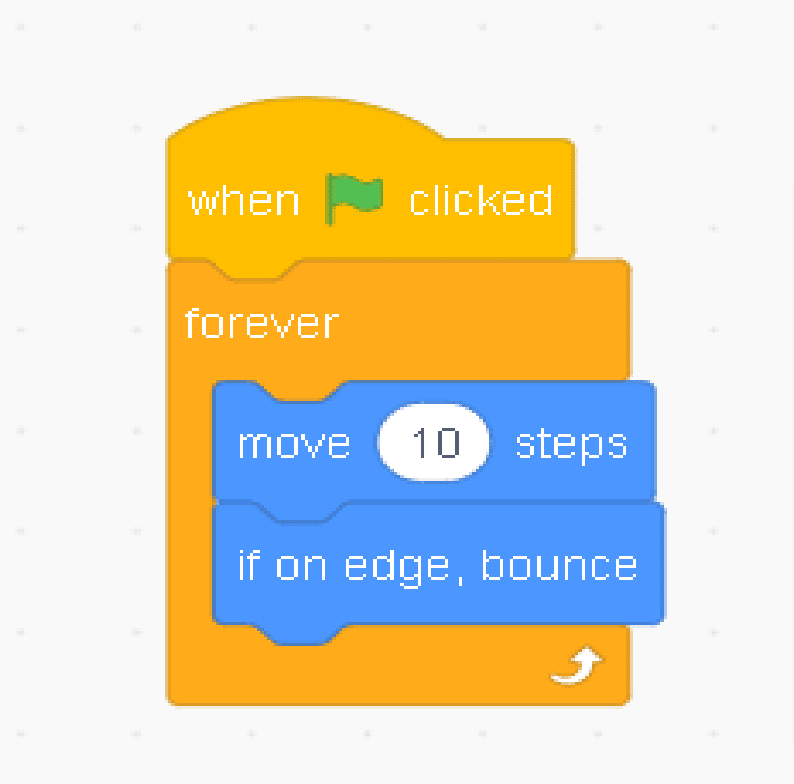
STEP 14: Put the ” move 10 steps” and ” if one the edge bounce” block within the forever as shown above.
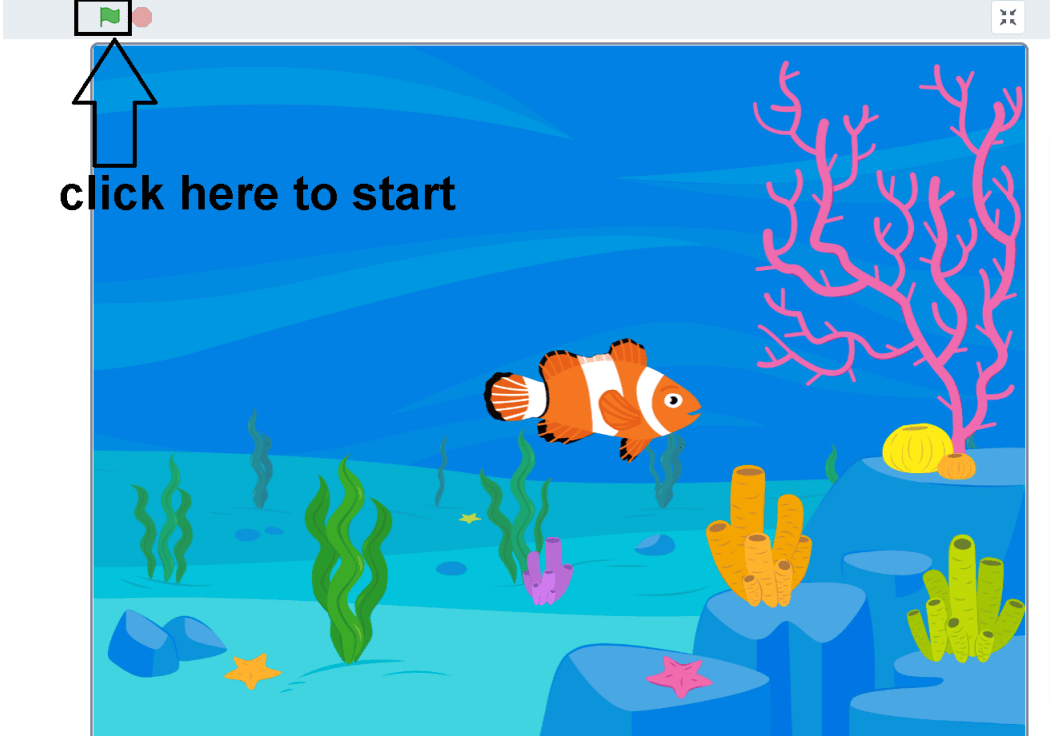
STEP 15: Now click on the green flag at the top left of test screen and fish will move to the edge and bounce back.
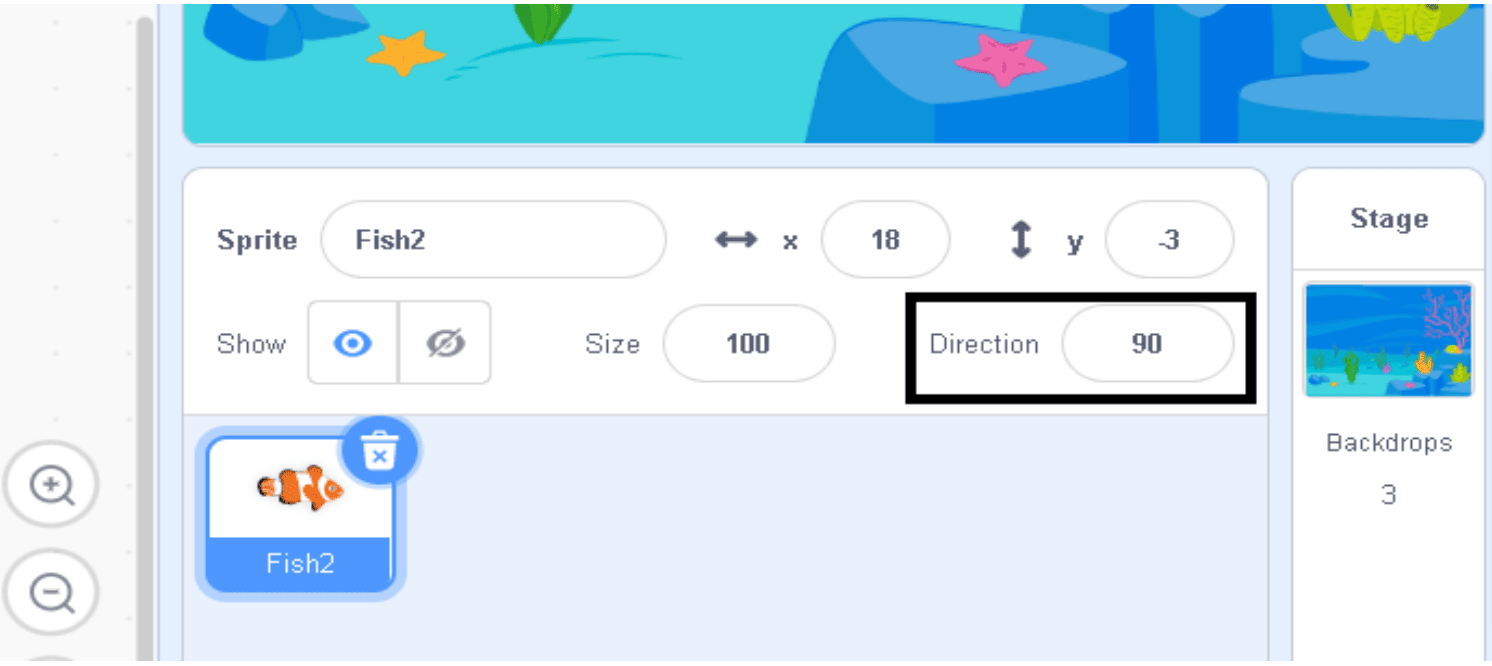
STEP 16: Adjust the direction if needed from the direction tab if there is any error in the movement of the fish.
STEP 17: Click the red button to the left of the green flag to stop.
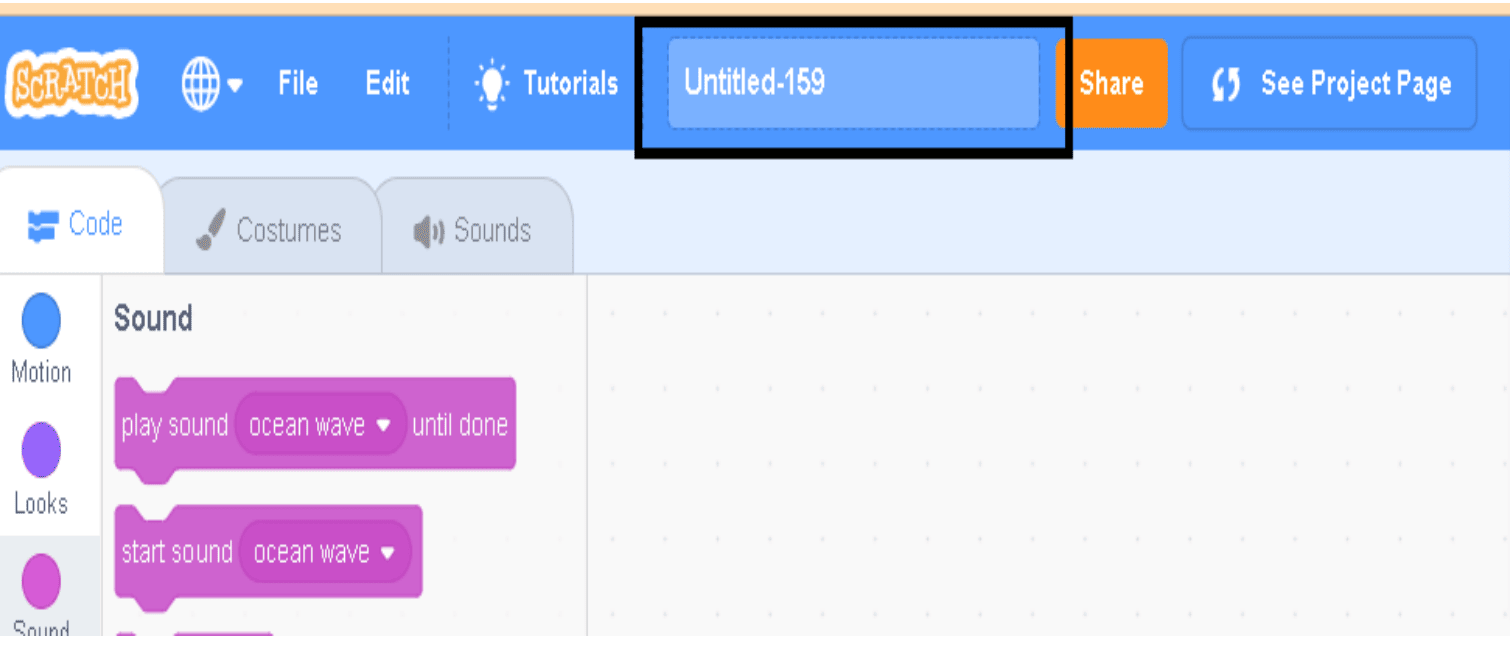
STEP 18: Rename the project
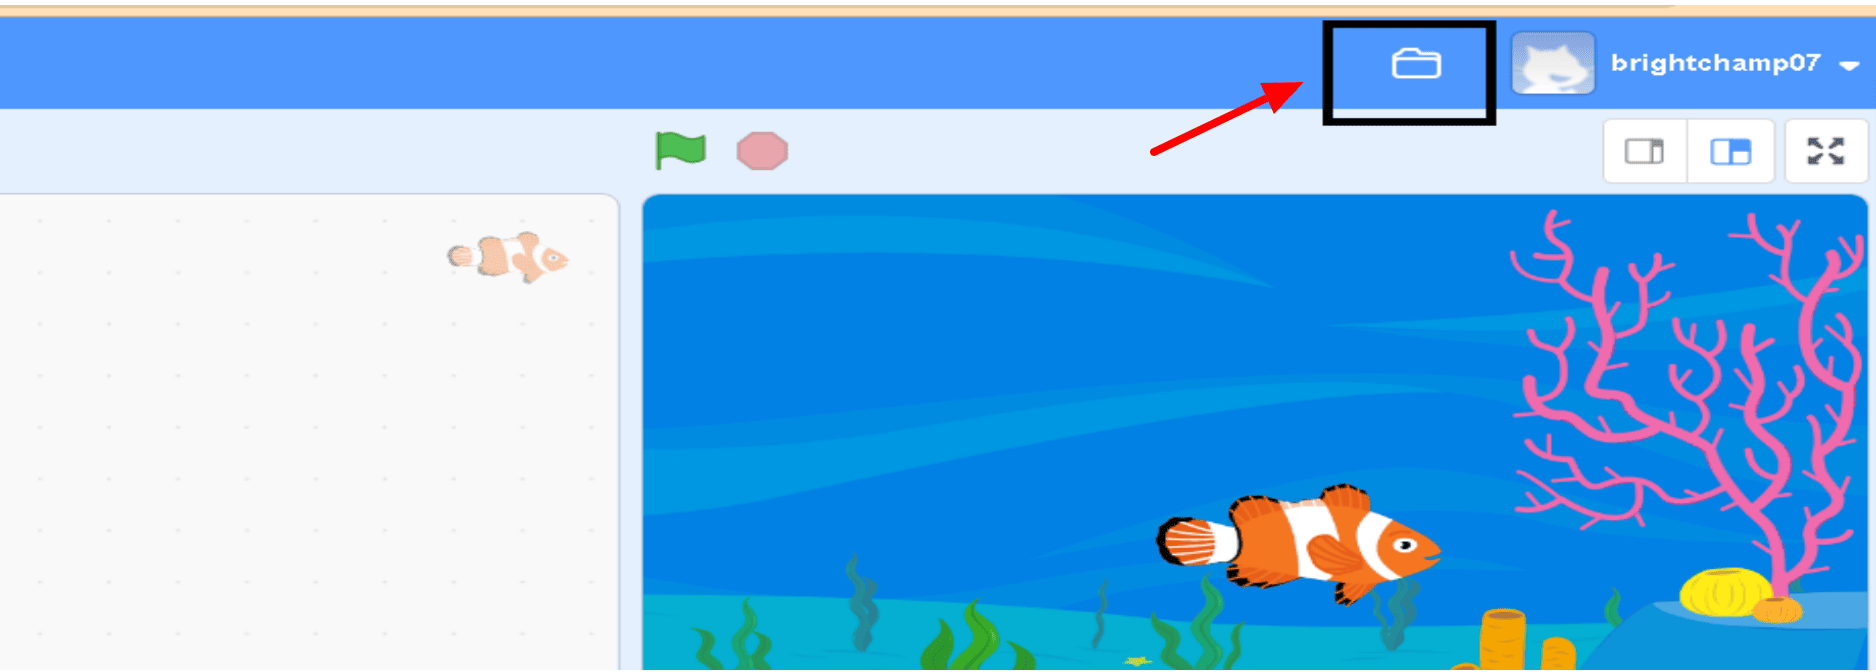
STEP 19: Save the project
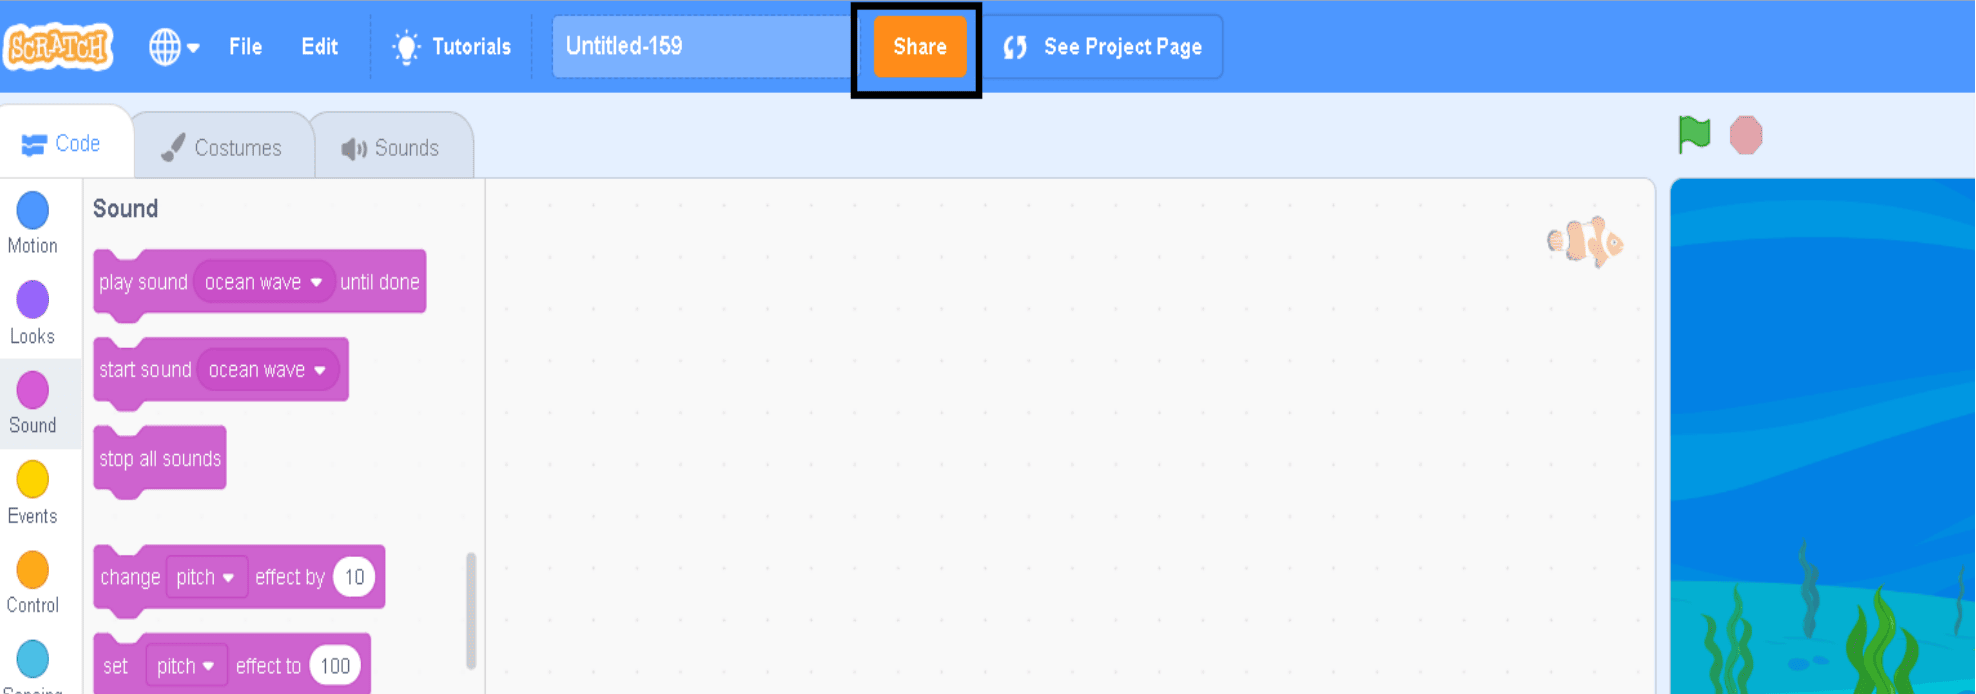
STEP 20: You may share the project if your mail is verified.
Benefits of Scratch Programming
- Scratch coding is entertaining and inventive:
Scratch programming for youngsters encourages kids to think beyond the box and freely express themselves. Furthermore, the projects they create are entertaining and interesting, making studying pleasurable.
- Scratch coding improves thinking and analytical abilities:
One of the most beneficial aspects of Scratch coding for kids is that it helps them build their logical thinking skills. Kids naturally acquire problem-solving strategies by resolving numerous situations that arise.
-
Scratch programming has a visually pleasing interface:
Scratch coding makes it easy to get your child interested in programming since it is visually appealing. It helps youngsters to visualise their coding, making the process more pleasant and memorable for them.
-
Scratch programming is simple to understand:
One of the most difficult aspects about coding is that it takes a lot of time and effort to properly grasp and comprehend. This is not the case with Scratch coding for youngsters. Because the language was designed for children, it is simple to grasp. To learn how the language works, children do not require sophisticated books, guidelines, or tutorials.
-
Scratch coding is easily accessible:
Scratch programming is accessible to almost everyone with an internet connection. As a result, by using Scratch for kids, you can provide your child with an excellent coding education from the comfort of your own home
-
Excellent hardware extensions:
Scratch programming is ideal if your youngster enjoys getting his or her hands dirty and investing time and energy on practical things. Several firms produce hardware kits that work with Scratch to build interesting projects. Microbit and Makey-Makey, for example, allow youngsters to design and build their own gaming controllers.
-
Acts as a primer on programming:
Kids may get a taste of programming by playing with Scratch. From there, individuals may hone their talents and expand out into different specialisations based on their interests. We frequently see children who develop an interest in programming after spending time on Scratch. They eventually pursue degrees in computer engineering and learn to speak a variety of other languages. Scratch programming for kids is thus an excellent starting point for young minds in every aspect.
Other Advantages of Learning Scratch are as follows:
- Assists youngsters in becoming technologically literate.
- Increase the desire to put ideas into action.
- It is the ideal blend of pleasure and benefit.
- Developing project management abilities Improve your social abilities.
Are there any disadvantages of Scratch Programming?
- One downside of starting from scratch is that others can grab your work and make it their own. This is referred to as a remix. If the user does not credit the original inventor of the scratch project, others claiming credit for work produced might be a disadvantage.
- Another downside of utilising scratch is the absence of user training. This might be done on behalf of both the teacher and the student.
- Teachers are unable to supervise what kids create from beginning. The student may utilise inappropriate content that the teacher is unaware of until they see the finished scratch creation.
- Students under the age of 13 must use their parent’s or guardian’s email account; some students’ parents do not have email addresses, which may be a hurdle while utilising scratch.
Is Coding on Scratch Safe?
Scratch coding is completely risk-free! It was created with teenagers in mind. Your projects are only made public if you want them to be. When you make an account, they apply content filters to promote clean language and gather minimal information.
Scratch FAQs
Can I use Scratch without creating an account?
Yes, you can but to avail more features you need to create an account.
How to verify my Scratch account so that I can share my project?
- Navigate to the “Email Tab” in the Scratch Website’s Account Settings page.
- The email has already been sent if the account was created prior to the update. If not, press the “Send” button.
- Sign in to your email account.
- There should be an email asking you to confirm your subscription.
- Click the “Confirm my email address” button.
What can I do to not have to keep pressing the green flag to make the character move in Scratch?
Put a “When Key Pressed” block in front of the move commands instead of a “When Green Flag Clicked” block.
Is it possible to duplicate a costume in Scratch?
You certainly can! Go to costumes by clicking on your sprite. Click the costume and then the middle mouse button; you’ll see options like duplicate, save to a local file, and so on. Duplicate it, and you’re done.
What is the best way to move sprites in Scratch?
Drag the following blocks in the following order: When [key you chose to make the sprite move] is pressed, the sprite will move [number of steps]. Add a “Point [direction]” block before the “Move” block if you want it to point in the direction it’s moving.
How can I upload a sound on Scratch?
Go to the sound tab, hover over the button that looks like a volume bar, and click upload. It should load automatically after a few moments.

Meet the Author
Chirandeep Bhattacharjee
I am a software developer engineer & a coding educator at BrightChamps. Apart from my love for coding, I take a deep interest in teaching, writing blogs, and mimicking acts. At BrightChamps, I am on a mission to empower kids with the next-gen skills
Get a Talent Discovery Certificate after trial class
100% Risk-Free. No Credit Card Required


